There are TONS of Google Maps features that most people don’t even know about! Check out settings you didn’t know you could change, tips for everyday navigation, cool tools to use while traveling, and lesser-known features in Places. Some of these are just plain fun!
Settings you didn’t know you could change
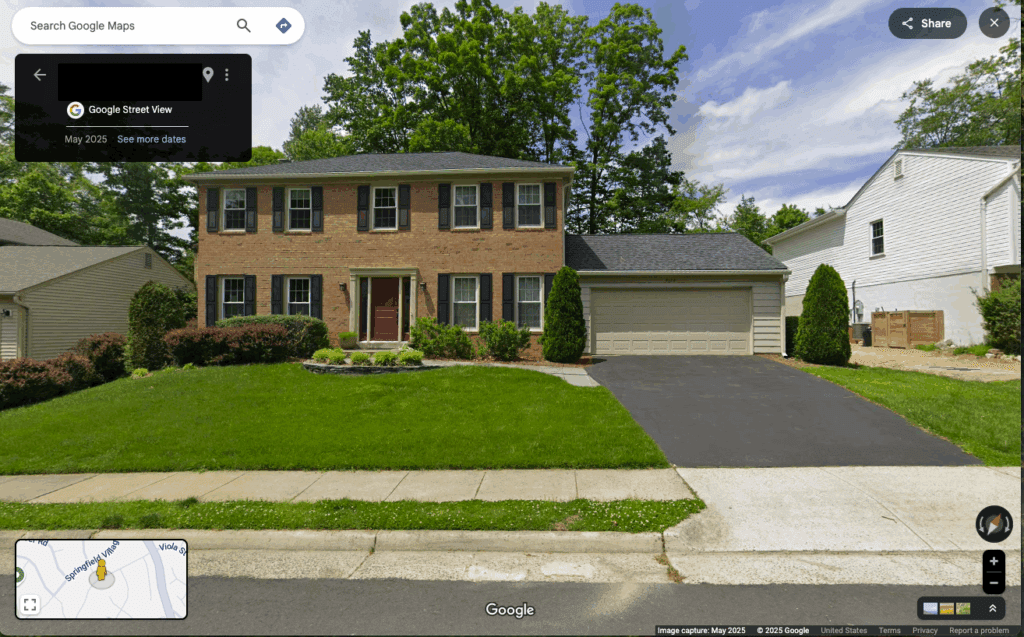
Blur your home on Google Maps
First up is a privacy setting. If your home is captured by a Google Street View car and used on Google Maps Street View, you can actually request for it to be blurred to protect your privacy. Some people choose to do so as a safety measure against potential burglars, worried that they may scout locations on Google maps for layout, entrance, and surveillance systems. Others argue that blurring it attracts more attention since it stands out. I’m inclined to think that neither of these will have much impact, but do whatever makes you feel safest
You can also request missed faces, license plates, etc. to be blurred.
Just be aware that users report that once blurred, Google will not “unblur” a home at any time, even if it changes ownership.
If you do decide to request your home be (permanently) blurred on Google Maps, here’s how to do it:
- Open Google Maps and find your home on Street View
- In the bottom right, click “Report a Problem”
- Fill out the form and submit

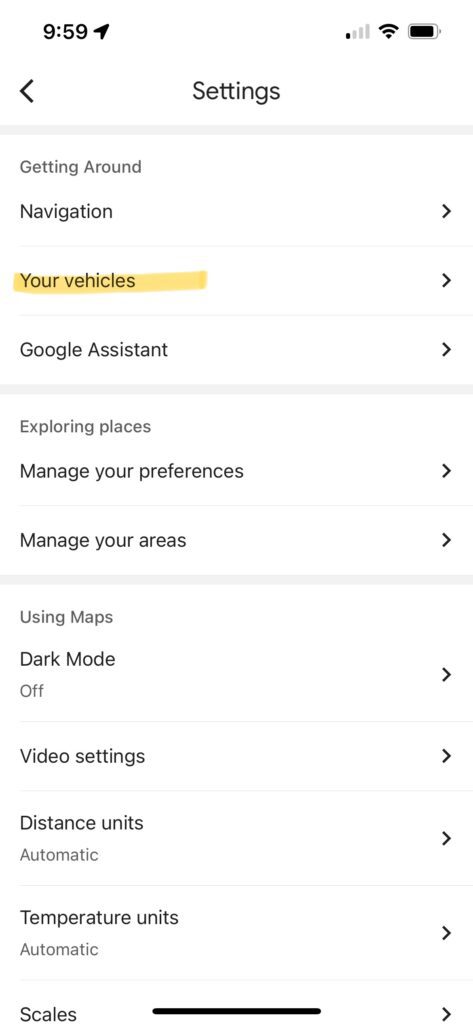
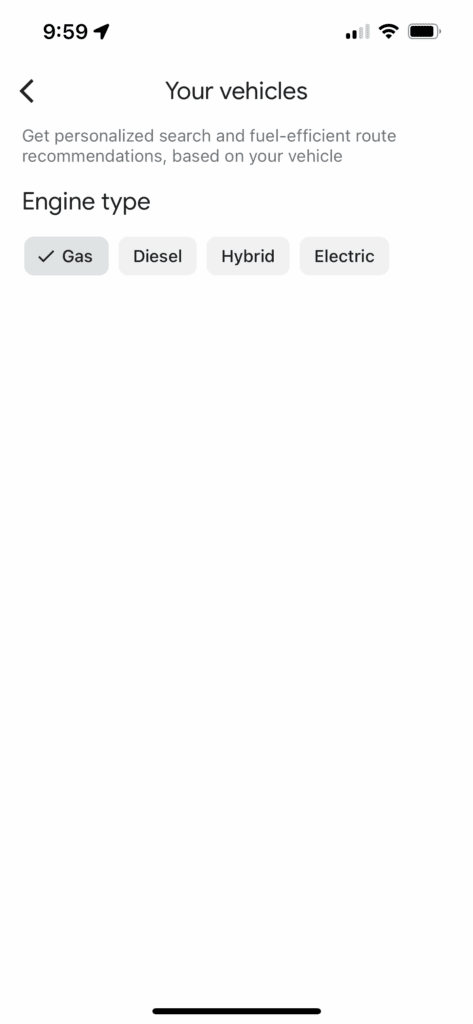
Change your vehicle type
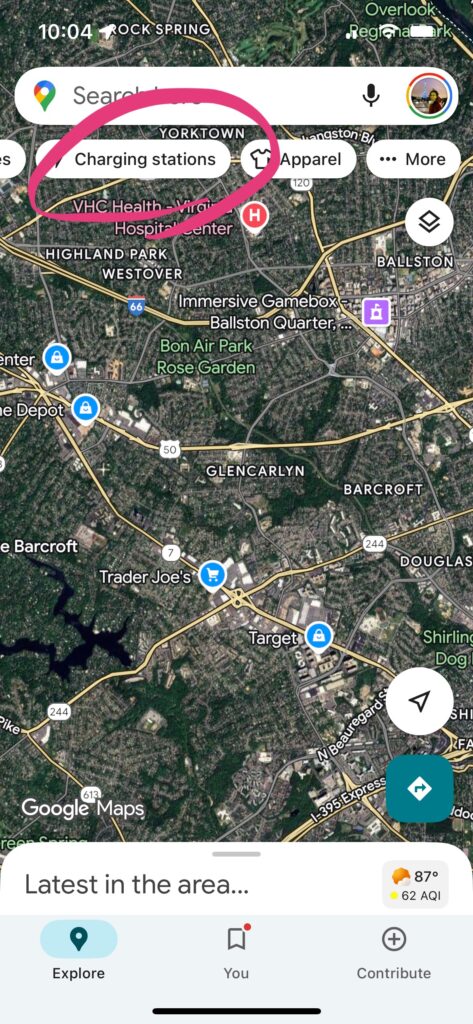
Google Maps makes different route recommendations based on your engine type to maximize fuel efficiency. It can also recommend where to find electric vehicle charging stations – so if you drive an electric vehicle, you’ll want to change this setting!
First, set up a vehicle profile:
- In the Google Maps app, tap your profile picture or initial, then click settings, then Your vehicle
- Then select the engine type you have: Gas, Diesel, Hybrid, or Electric
If you’ve selected Electric, you’ll now see “Charging Stations” as a recommended type of place to search for.
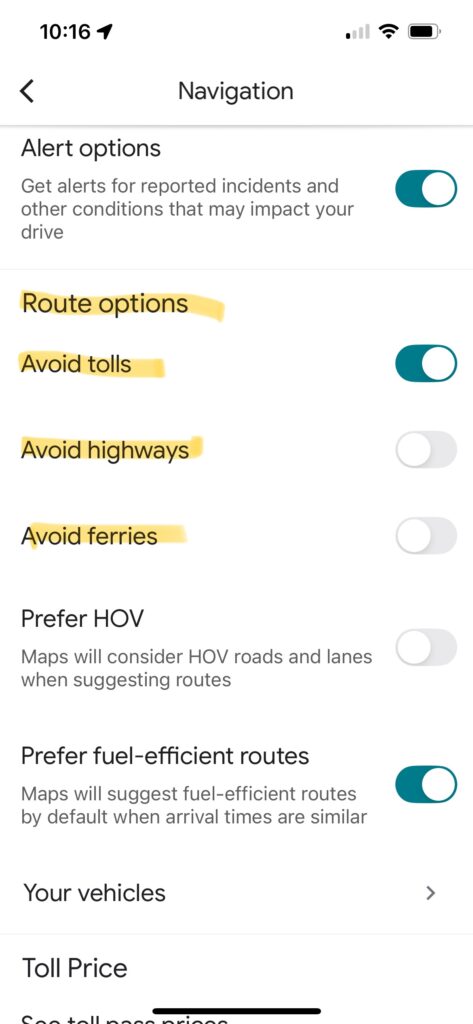
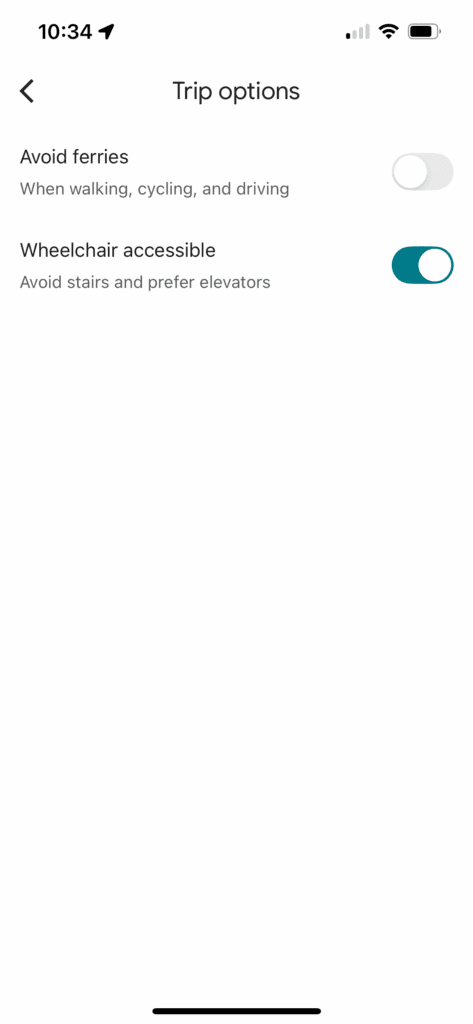
Avoid tolls, highways, and ferries
If you live in an area with a lot of toll roads like I do (the DC area, which recently outranked Los Angeles for worst traffic in the country, woo!), you’ll want to be familiar with these options when navigating. You can choose to avoid tolls, avoid highways, and/or avoid ferries for your directions.
To permanently avoid:
- Open the Google Maps app and tap your profile icon, then select Settings
- Select “Navigation”
- Scroll down to Route Options, and toggle the options you want to change
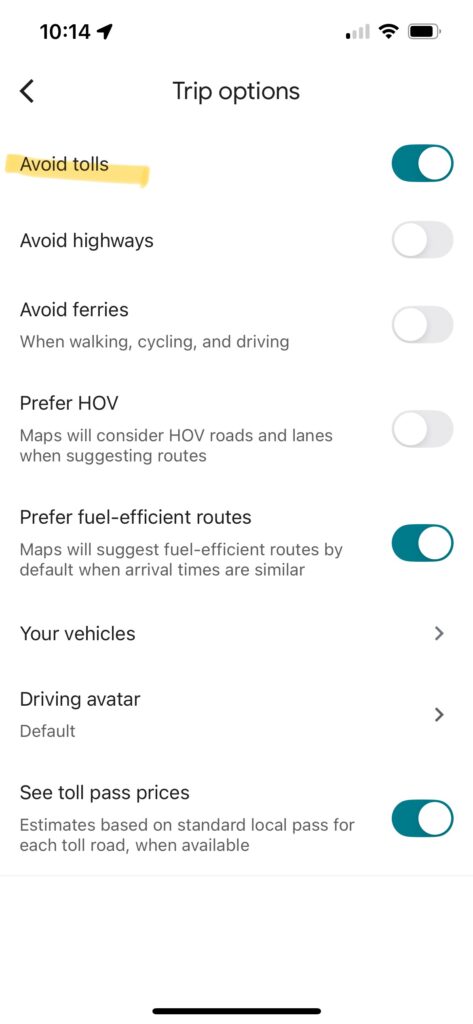
To avoid on a trip-by-trip basis:
- Input your destination and tap “Directions”
- In the “Drive” window, tap the settings icon
- Select avoid tolls, avoid highways, and/or avoid ferries
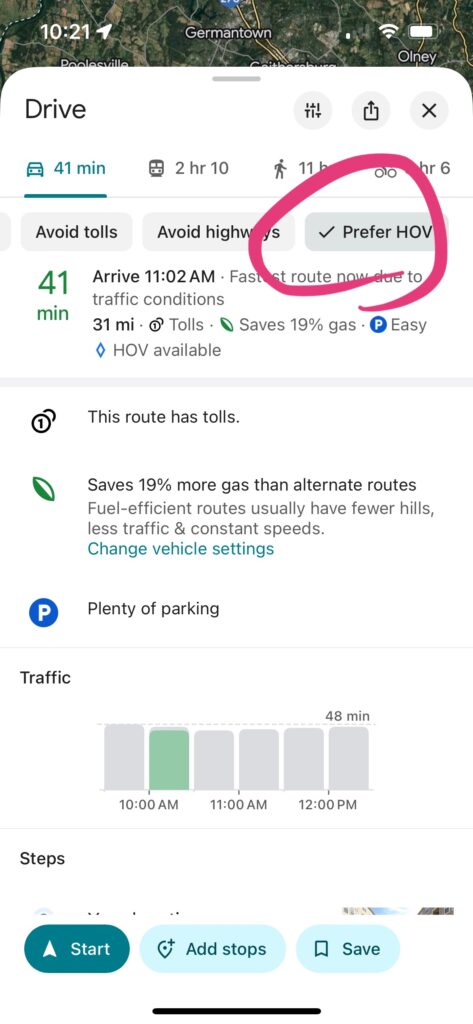
HOV Lane settings
You can also change your HOV lane settings. I tend to prefer HOV lanes, since some of the roads around me charge a toll unless you have 3+ passengers, and I typically have my kids with me. I am not paying a cent more than I have to in order to get around!
To permanently prefer HOV lanes:
- Open the Google Maps app and tap your profile icon, then select Settings
- Select “Navigation”
- Scroll down to “Prefer HOV” and toggle to on

To prefer HOV on a trip-by-trip basis:
- Input your destination and tap “Directions”
- In the “Drive” window, you should see “Prefer HOV” as an option – make sure it is checked
- Otherwise, tap the Settings icon and select Prefer HOV
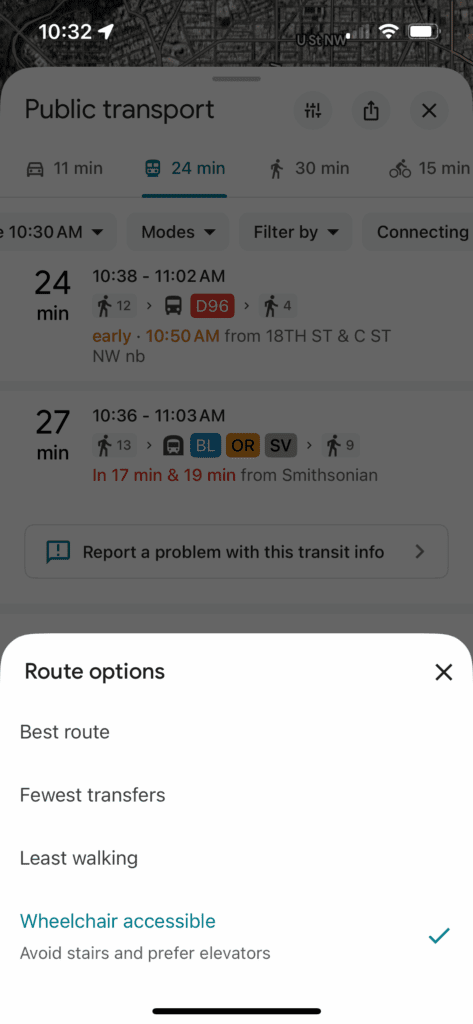
Enable wheelchair accessibility for public transit or walking directions (which indicates stroller accessibility, too)
Wheelchair accessibility is available for both public transit and walking directions. This allows you to avoid stairs and prefer elevators – helpful for wheelchair users, others with mobility needs, or even folks pulling suitcases or pushing strollers.
To enable wheelchair accessibility when searching for directions:
- Input your destination and tap “Directions”
- For Public Transportation:
- Tap “Filter by” and select “Wheelchair accessible”, OR tap the Settings icon and select Wheelchair accessible
- For Walking
- Tap the Settings icon and select Wheelchair accessible
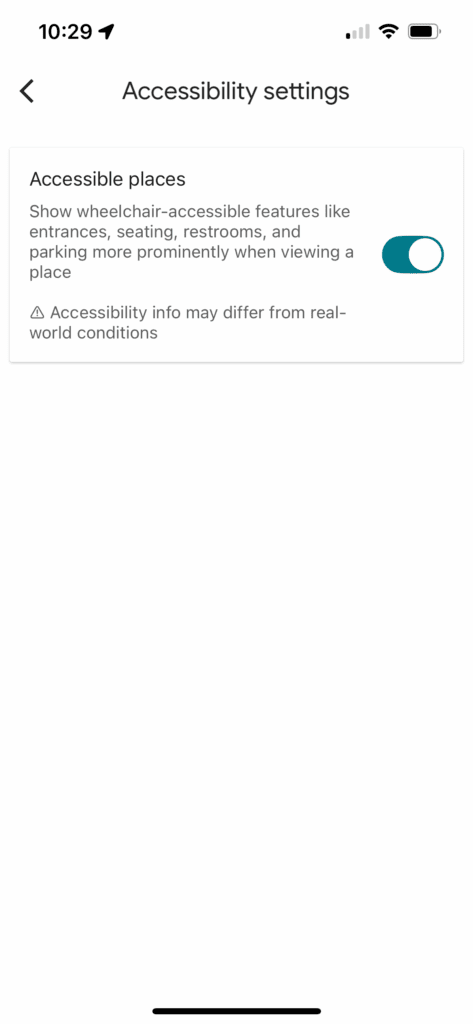
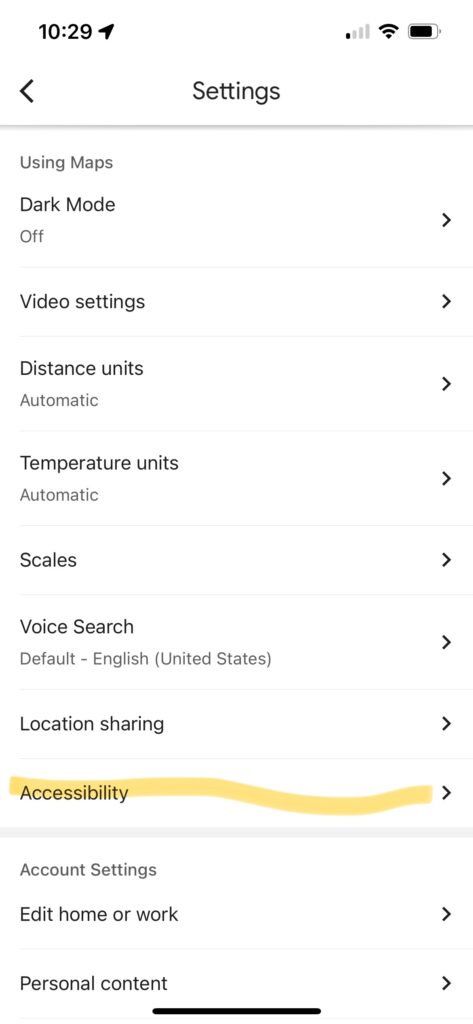
You can also enable “accessible places” to find wheelchair accessible features like entrances, seating, restrooms, and parking more prominently when viewing a place. To enable this:
- Open the Google Maps app and tap your profile icon, then select Settings
- Scroll down and select Accessibility
- Toggle Accessible Places to On
Add travel time to your Google Calendar
Adding the amount of time it takes for you to get to your destination as a calendar item can help you plan better and stay organized. This is an integration between Google Calendar and Google Maps – one of the reasons I love using Google products to keep my family organized.
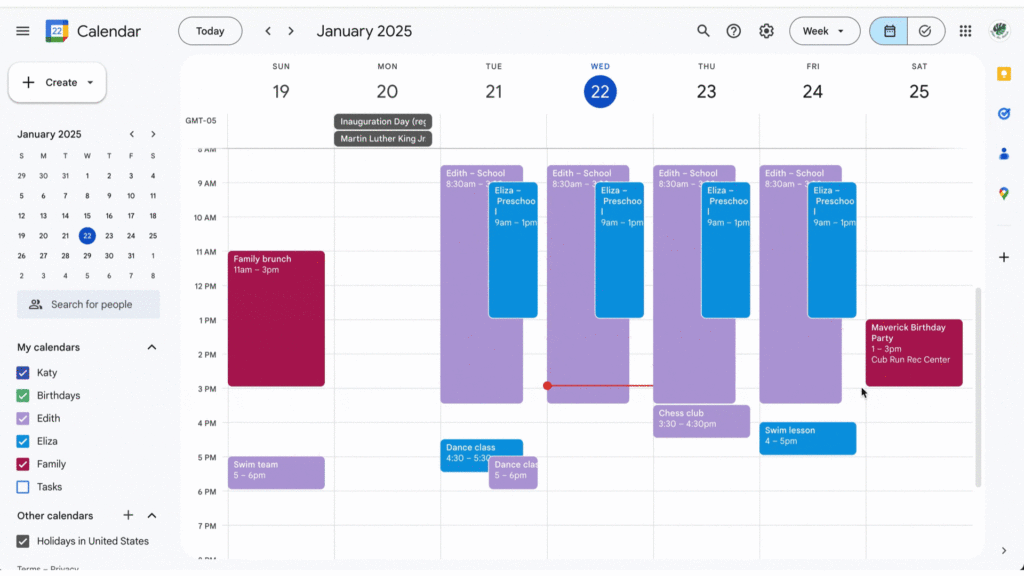
Here’s how to do it:
- Open an event on your calendar. You need to do this on desktop, as it does not exist on mobile.
- Next to the address, click the map icon to “Preview in Maps.” (In the GIF above, you’ll see that I actually just clicked on the address – that works too.)
- In the Maps sidebar that opens up, add your starting point. Select a route.
- Click “add to calendar.” This will add an event to your default calendar, not necessarily the one you have open, so you may need to edit the travel time event to move it to the correct calendar.
Now, keep in mind that travel time can’t be added by default and must be added for each event. Personally, I use this feature for “out of the ordinary” events to get a better sense of our day, but not for recurring activities and lessons on our calendar. However, if you are one of those chronically late people, or maybe you’re still trying to find your flow for a new school year’s set of logistics, you may want to add the travel time as recurring events too.
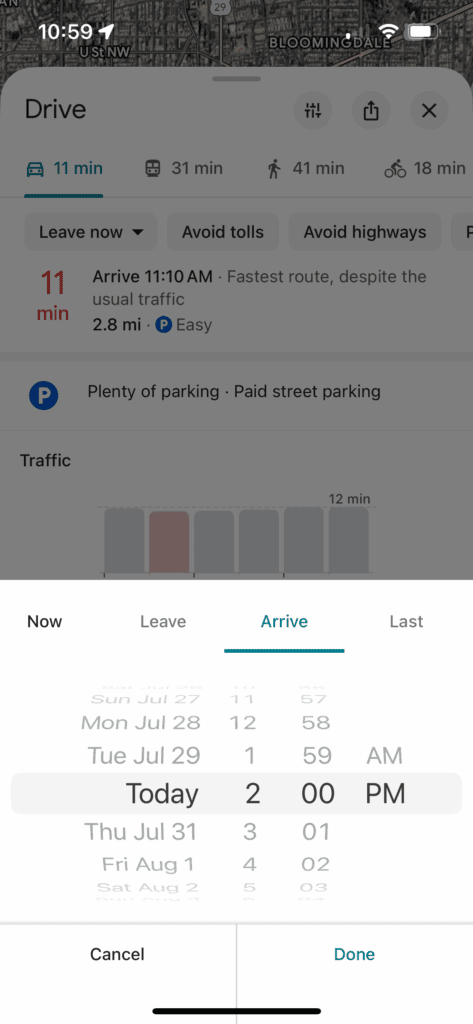
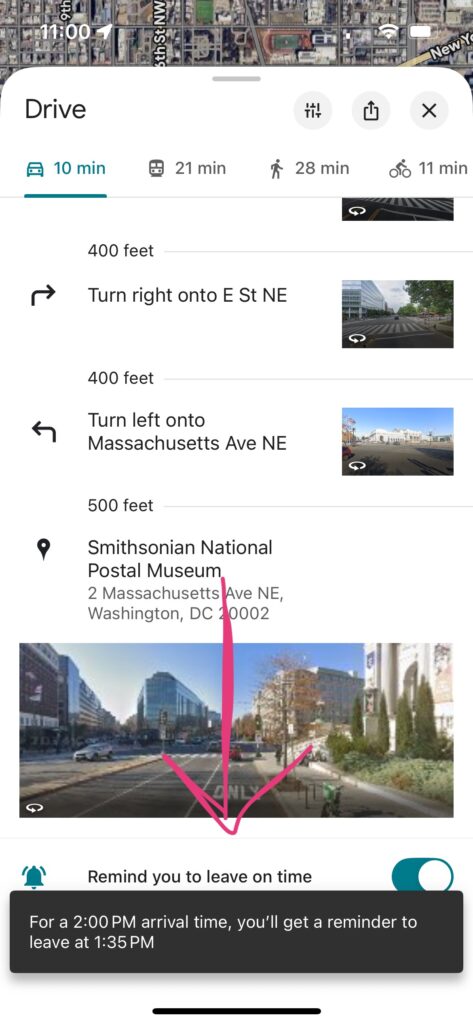
Have Google Maps remind you to leave on time
Even if you don’t add travel time to your Google Calendar, you can still have Google remind you when it’s time to leave. It takes time of day and typical traffic to give you an estimated range. I’ve been using it while my kids are at summer camp this week and I’m driving an unfamiliar route to pick them up. (Shoutout to my summer camp planner, which back in January helped me pick this camp and make sure it isn’t too far away!)
To find out how long your trip will take:
- Open Google Maps and select the starting and ending locations
- Swipe up expand the drive menu, then tap “Leave now”
- If you want to set the time you’ll leave your first location, set a time under “Leave.” If you want to set the time you’ll arrive – typically more useful in my experience – tap “Arrive” and then select your arrival time.
- Scroll down and toggle “Remind you to leave on time”. Google will tell you what time the reminder will be sent.
Save your parking location when you get out of your car
Ever park in an unfamiliar location in the city and forget where you left your car? (Or, never done this, but always nervous you’re going to?) Google Maps can remember your parking spot for you.
Here’s how to save your parking location when you arrive:
- When you reach your destination, open Google Maps
- Tap the blue dot that shows your current location
- Tap “Save parking”
- You can tap “Share” to send this to others or even text it to yourself
Later, to find your parked car:
- Reopen Google Maps
- Look for the gray icon that says “You parked here”
- You can now use directions to navigate to that location
- Or, if you texted yourself the link earlier, just use that
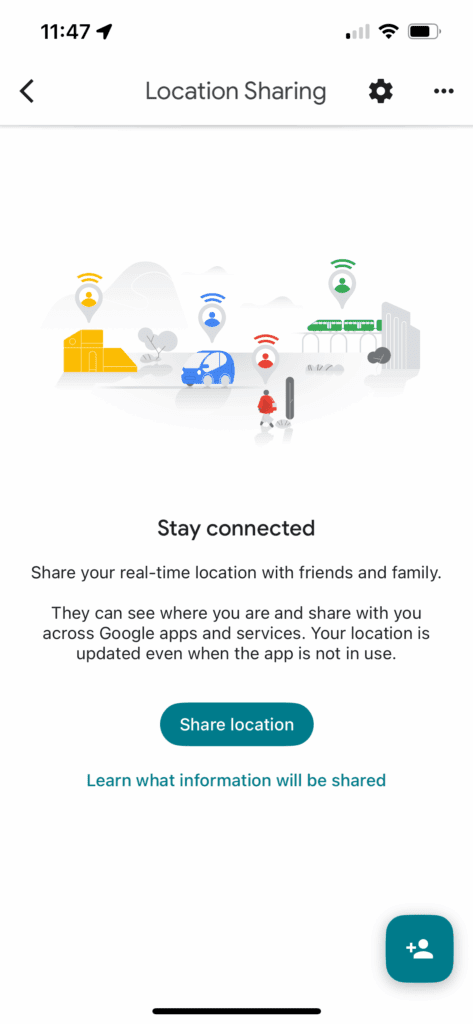
Google Maps offers the ability to share your live, real-time location with others, which is helpful when you are trying to meet up with friends; want your partner to know where you are on a run; or in tons of situations while traveling. You can choose who can find your location and how long you share it in Google Maps.
Be aware that when you share your location with someone, they will be able to see: your name and photo, your device’s recent location even when Google apps aren’t being used; the device’s battery power and if it’s charging; arrival and departure time if they add a Location Sharing notification.
Here’s how to share your location:
- Open the Google Maps app
- Tap your profile picture, select Location sharing, and tap “Share location”
- Choose how long you want to share your location
- Tap the person with whom you want to share your location
If you want to share your estimated time of arrival:
- Open the Google Maps app
- Set a destination and begin navigation
- Tap Share trip progress
- Tap the person you want to share it with and tap Share
- It will stop sharing once you arrive at your destination, or you can choose to stop sharing earlier

Google Maps features for travel
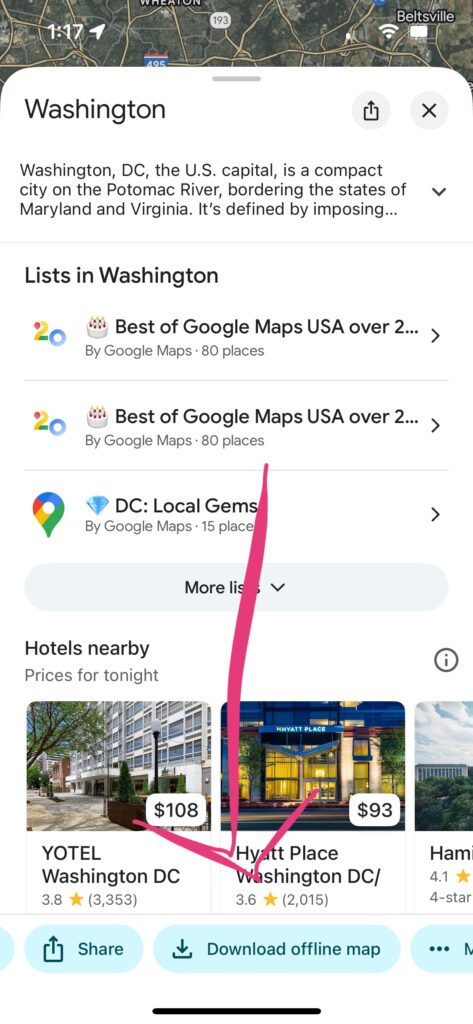
Download maps for offline use
This is one that you may know about, but I wanted to share in case you don’t! You can download areas in Google Maps to use when offline, which is great for when you’re traveling and may have spotty Internet access. Of course, it won’t include traffic info when offline.
Here’s how:
- Open Google Maps and search for a place, like “Washington DC”
- Tap the name or address of the place, then scroll through the bubbles at the bottom until you see “Download offline map.”
- Select the area you want to download and tap “Download”
Create a Google Map with locations for a trip
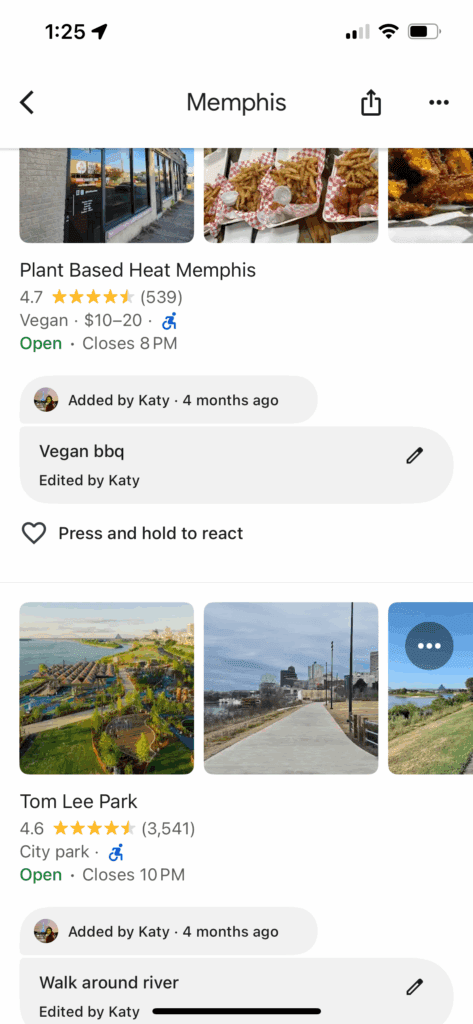
There are two main ways to save locations in Google Maps if you’re planning for a trip and want to collect restaurants, tourist destinations, etc. in a map view.
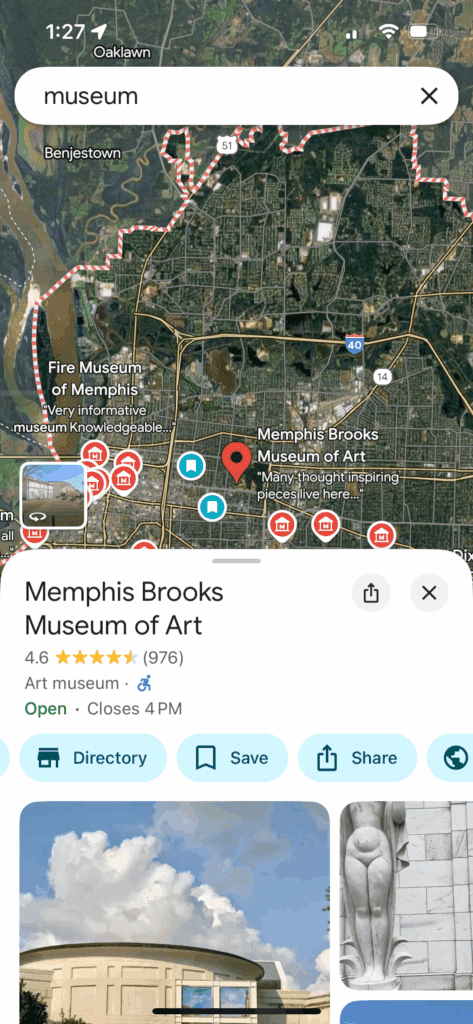
The first is with “Lists”, which is the most straightforward. A list is basically a collection of places that you’ve saved, like this one I made for a trip to Memphis:
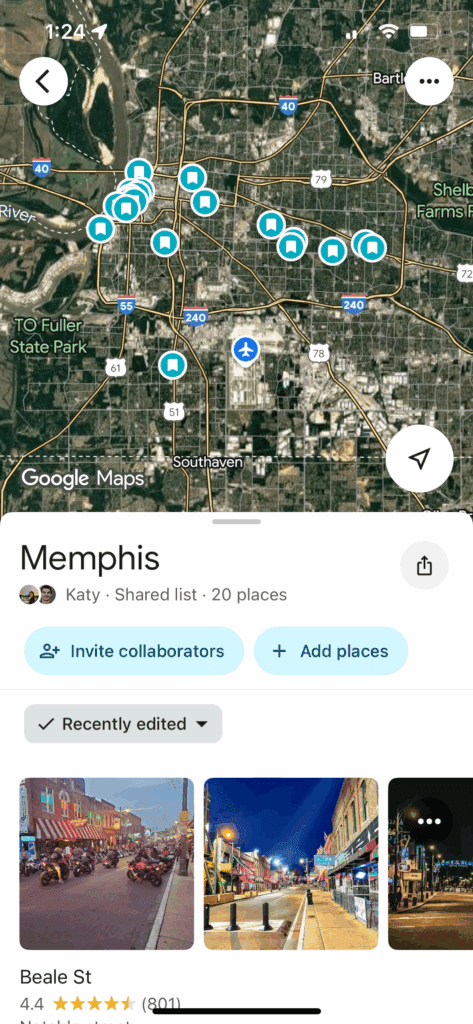
To make and use lists while on Desktop:
- Open Google Maps, click Menu and click Saved
- In the top right, click New list
- Enter a name and description and save.
- To add a place to your list, search for a place or click it on the map, then click Save.
- Choose a list to save it to.
To make and use lists on iPhone and iPad:
- Open the Google Maps app.
- Tap You
 .
. - Tap New list, enter a name and description, and tap Save
- To save a place to your list, search for a place or tap it on the map. Tap the place’s name or address and tap Save
The more feature-rich way to make such a map is with “My Maps”. This allows more customization like layers, categories, colors and shapes for icons, and adding lines, shapes, and images to your map. I used to use this for trip planning, but now I would prefer Lists and would save My Maps for more complex data sharing like an area guide I will share with many people or visualizing a data set.
Here’s one created by Holly’s Tacky Christmas Lights that we use for Christmas decor sightseeing every year.
If you’d like to create a map, you’ll need to be on desktop, as it isn’t available on mobile. Then:
- Visit My Maps
- Click Create a new map
- Go to the top left and click Untitled Map, and add a name and description
- To add a place, click Add marker and select a layer where to put it. Give your place a name and click Save.
Use Google Lens to get info on places you’re looking at
This is one of those features that makes me feel like I’m living in the future. You can use your camera to look at places around you, and Google Lens combined with Google Maps will help you identify where you are and what’s around you, such as restaurants, stores, and more. This is only available in certain cities, so check it out when you’re traveling.
If it’s available, when you’re in Google Maps, you’ll see a lens icon next to the microphone in your search bar. Tap that to open the Lens in Maps view.
See inside buildings
If you go deep in the logistics like I do (this is a planning website, after all), you may prefer to know the lay of the land of an airport, museum, or other large building to plan your visit in advance. For some locations, you can actually see this on Google Maps!
To check it out:
- Open Google Maps and search for a place
- Tap the name of the place or address
- Scroll until you see photos and tap on a 360 photo. Note: 360 photos have the Street View symbol
Google Maps “Places” features you may not know
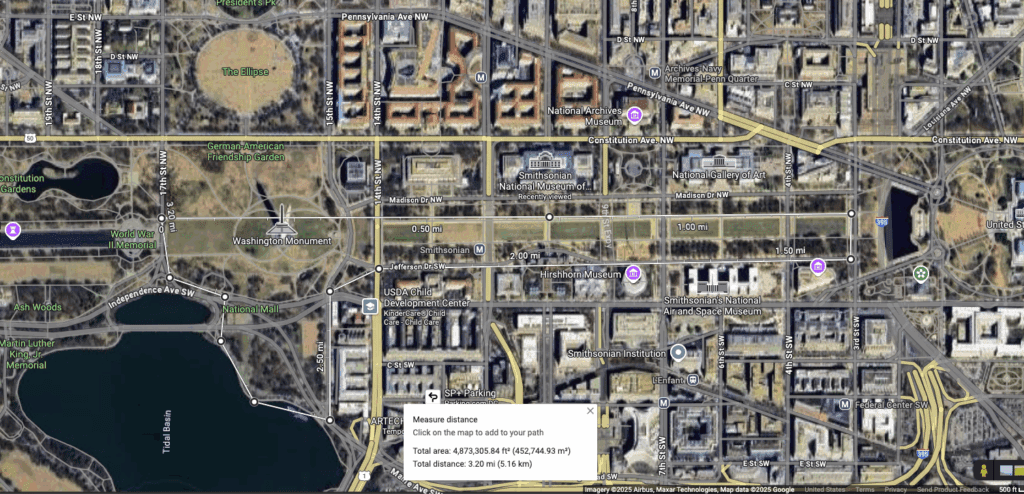
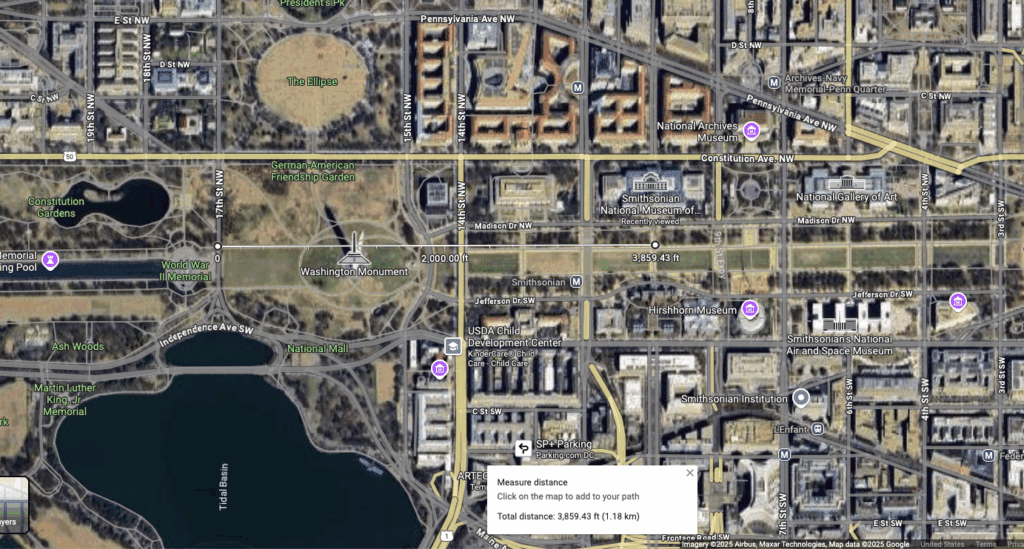
Measure distance and area on Google Maps
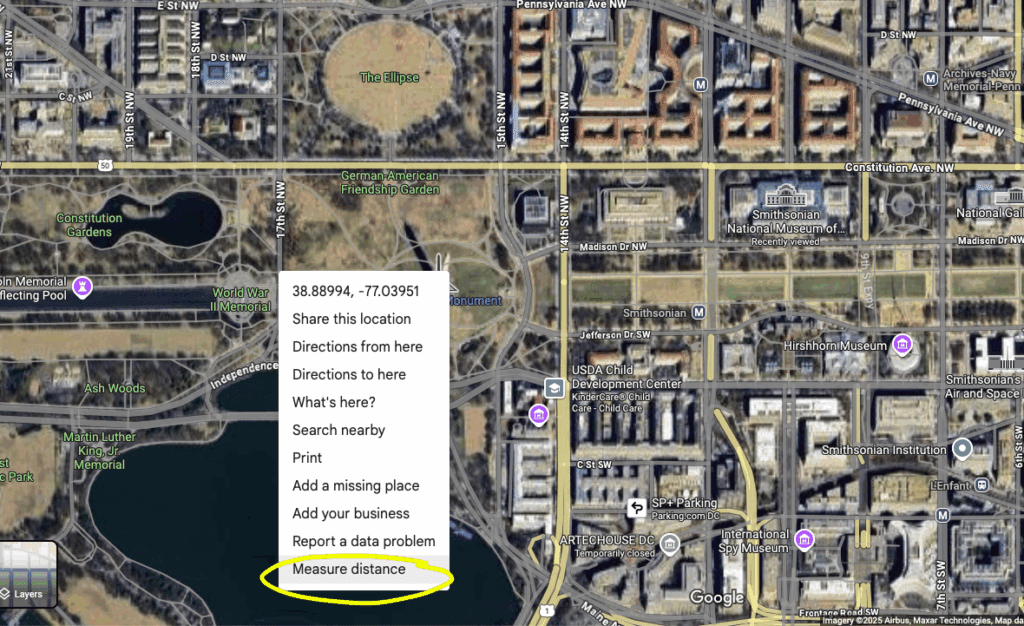
You can measure the distance and area between points on Google Maps. To do this on desktop:
- Open Google Maps and right-click on your starting point
- Select Measure distance
- Click anywhere on the map to create a path to measure. To add another point, click anywhere on the map.
- If you create an enclosed shape by returning to your starting point, you’ll also see the total area. Pretty cool!
Set your dietary preferences for restaurants
I’m vegetarian, so I definitely have this setting turned on! It brings restaurants with known vegetarian and vegan options to the top of my Google Maps search results. You can also select Alcohol Free, Gluten Free, Halal, and/or Kosher.
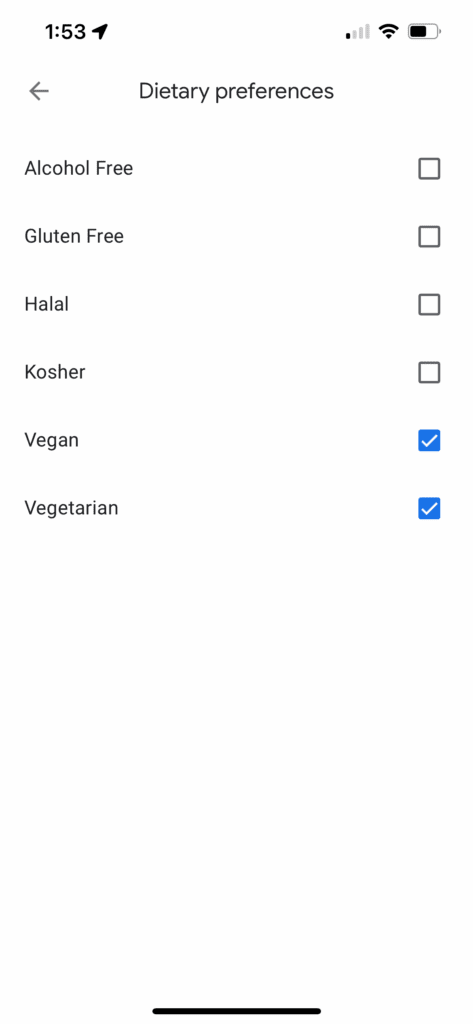
To update your settings:
- Open Google Maps and tap your profile icon, then select Settings.
- Tap Manage your preferences, then tap Dietary preferences
- Check or uncheck the boxes
More tech secrets to unlock: