


There are tons of hidden iPhone features that hardly anyone is using. From secret shortcuts, to built-in apps, to insanely useful settings – I guarantee you will find something you didn’t know on this list! Let’s dive in.
Phone & calling features
Block unknown callers to cut down on spam
Get annoying calls? You don’t need to let them interrupt you. You can send calls from unknown callers directly to voicemail. Just be sure to check your voicemail and/or save contacts like your kids’ school and doctors offices to your contacts so you don’t miss anything important. To turn on this feature:
- Go to Settings > Apps > Phone
- Tap “Silence Unknown Callers” and enable to silence calls from unknown numbers. The call will be sent to voicemail, and you will be able to see it on your recent calls list. Calls will continue to ring from people in your contacts, recent outgoing calls, and Siri Suggestions.
- Or, tap “Call Blocking & Identification” to turn on Silence Junk Callers (available with some carriers) to silence calls identified by your carrier as potential spam or fraud.
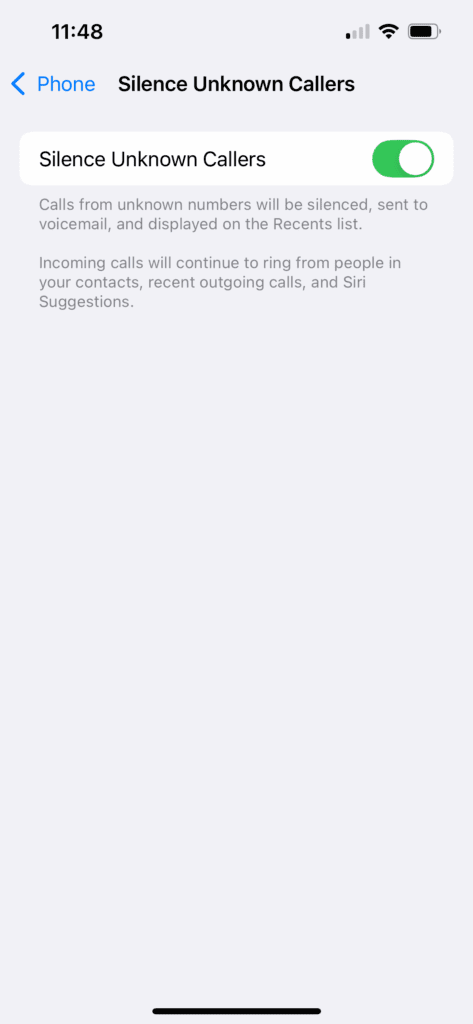

I typically have this setting turned on, but if I’m expecting a call from an unknown number, like the auto repair garage, I will turn the setting off.
Help friends and family with their devices via FaceTime
Mom, if you’re reading this, we’re going to have to try this feature next time you need help on your phone! While on a FaceTime call, you can share your screen with the person you’re talking to. To do this:
- During a FaceTime call, tap the screen to show FaceTime controls, then tap
 .
. - Tap Share My Screen. After a three-second countdown, other participants will be able to see your screen. You can also tap, draw, or write on your screen for the other person to see for a few seconds.
- Or, tap “Ask to Share” to request the person you’re talking to share their screen.
You can even request/give remote control in a FaceTime call on iPhone. This means you would be able to control someone else’s screen (or have them control yours.) This can let you help a relative with an issue with their phone or show them how to use an app. Here’s how:
- In the FaceTime app, once someone is sharing their screen with you, tap the window showing the shared screen
- Tap .
Record and transcribe a call
For important phone calls with content you want to remember, whether it’s a work meeting, call with a doctor, job interview, etc., it can be so helpful to record and transcribe the contents into writing. I’m more of a visual than auditory learner myself, so I will be making use of this feature. Of course, do make sure that the other participant is willing to be recorded.
To record a call:
- During a call, tap . Both call participants will hear an audio notice that the call is being recorded.
- To stop recording, tap or hang up.Call recordings are automatically saved to a Call Recordings folder in the Notes app.
- To see the call in the Notes app, tap View Saved Call.
iMessage texting features
Below are some of my favorite texting features on iPhone that I think are lesser known.
For more texting tricks, check out my full article that covers 19 things you can do in iMessage!
Format text messages with animations and styles
This iPhone hidden feature is mostly just for fun! You can add all sorts of formatting to your text messages, as long as you’re sending to another iPhone user. You may have noticed some of these before, such as balloons popping up when you send or receive the words “Happy birthday.” But there are more, including basics like bold and underline, to animating specific words, to animating the text bubble, to filling the entire screen with animation.
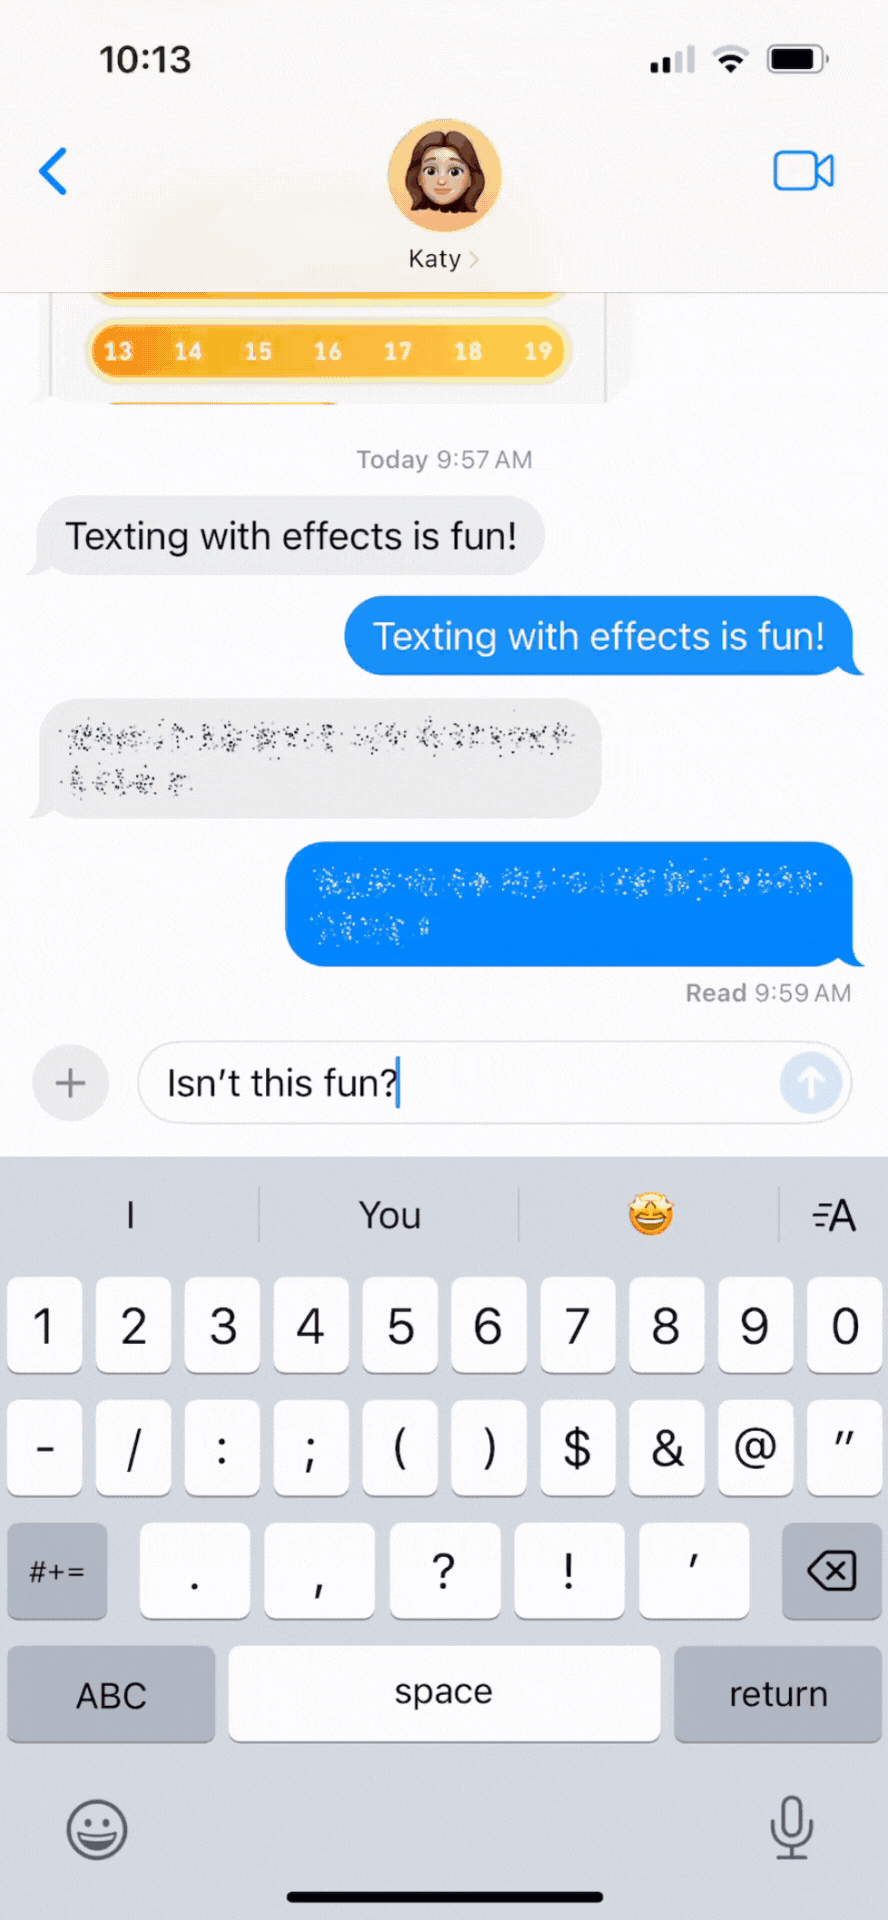
Here’s a full guide showing all the formatting that’s available, and how to add them to your texts.
Schedule a text to send later
Sometimes you want to send a text, but not have it delivered right away. Maybe you want to schedule a happy birthday text so you don’t forget. Or maybe you’re catching up on texts late at night (ahem, parenting) and you don’t want to disturb folks with a midnight ping. There are a bunch of reasons. Luckily, Apple added the ability to schedule a text message in late 2024.
Here’s how to schedule a message.
- Open the messages app and type a new message
- Tap the to the left of the text window, and select Send Later
- Pick the time. You can schedule messages up to 2 weeks into the future
- Click send

Boom! Your message is scheduled. Once it’s scheduled, you will see the word “edit” hovering over the message. This allows you to send the message now, edit the time, or delete the message.
Turn off notifications for unknown senders
If you get a lot of spam texts, check out the option to “Filter Unknown Senders”. You’ll see this just below the “Notify Me” option discussed above, found at Settings > Apps > Messages. When “Filter Unknown Senders” is turned on, messages from people who are not in your contacts will be sorted into a separate list. You won’t get notified about messages in this folder.
You can find your new folders back on the Messages list. In the top-left corner, there will be a link for “Filters”, which shows Known and Unknown senders. Personally, I leave this option off since I get messages from unknown senders related to my kids’ school, appointments, etc. that I want to make sure I don’t miss, but it can be useful if you get a lot of spam or if you’re diligent about checking the unknown senders folder.

Mute a text conversation
In a busy group text? You can mute it so it doesn’t bother you with too many notifications. When you mute a conversation, you still receive the messages, but you stop getting notifications for it. To mute a conversation, you have two options:
- From your Messages list, swipe left on the conversation, then select.
- Or, touch and hold the conversation and tap “Hide Alerts”.
My complaint about this feature is that it does not have a temporary mute function like Facebook Messenger does to mute for 15 minutes or one hour – you have to remember to go in and turn alerts back on if you want them later.
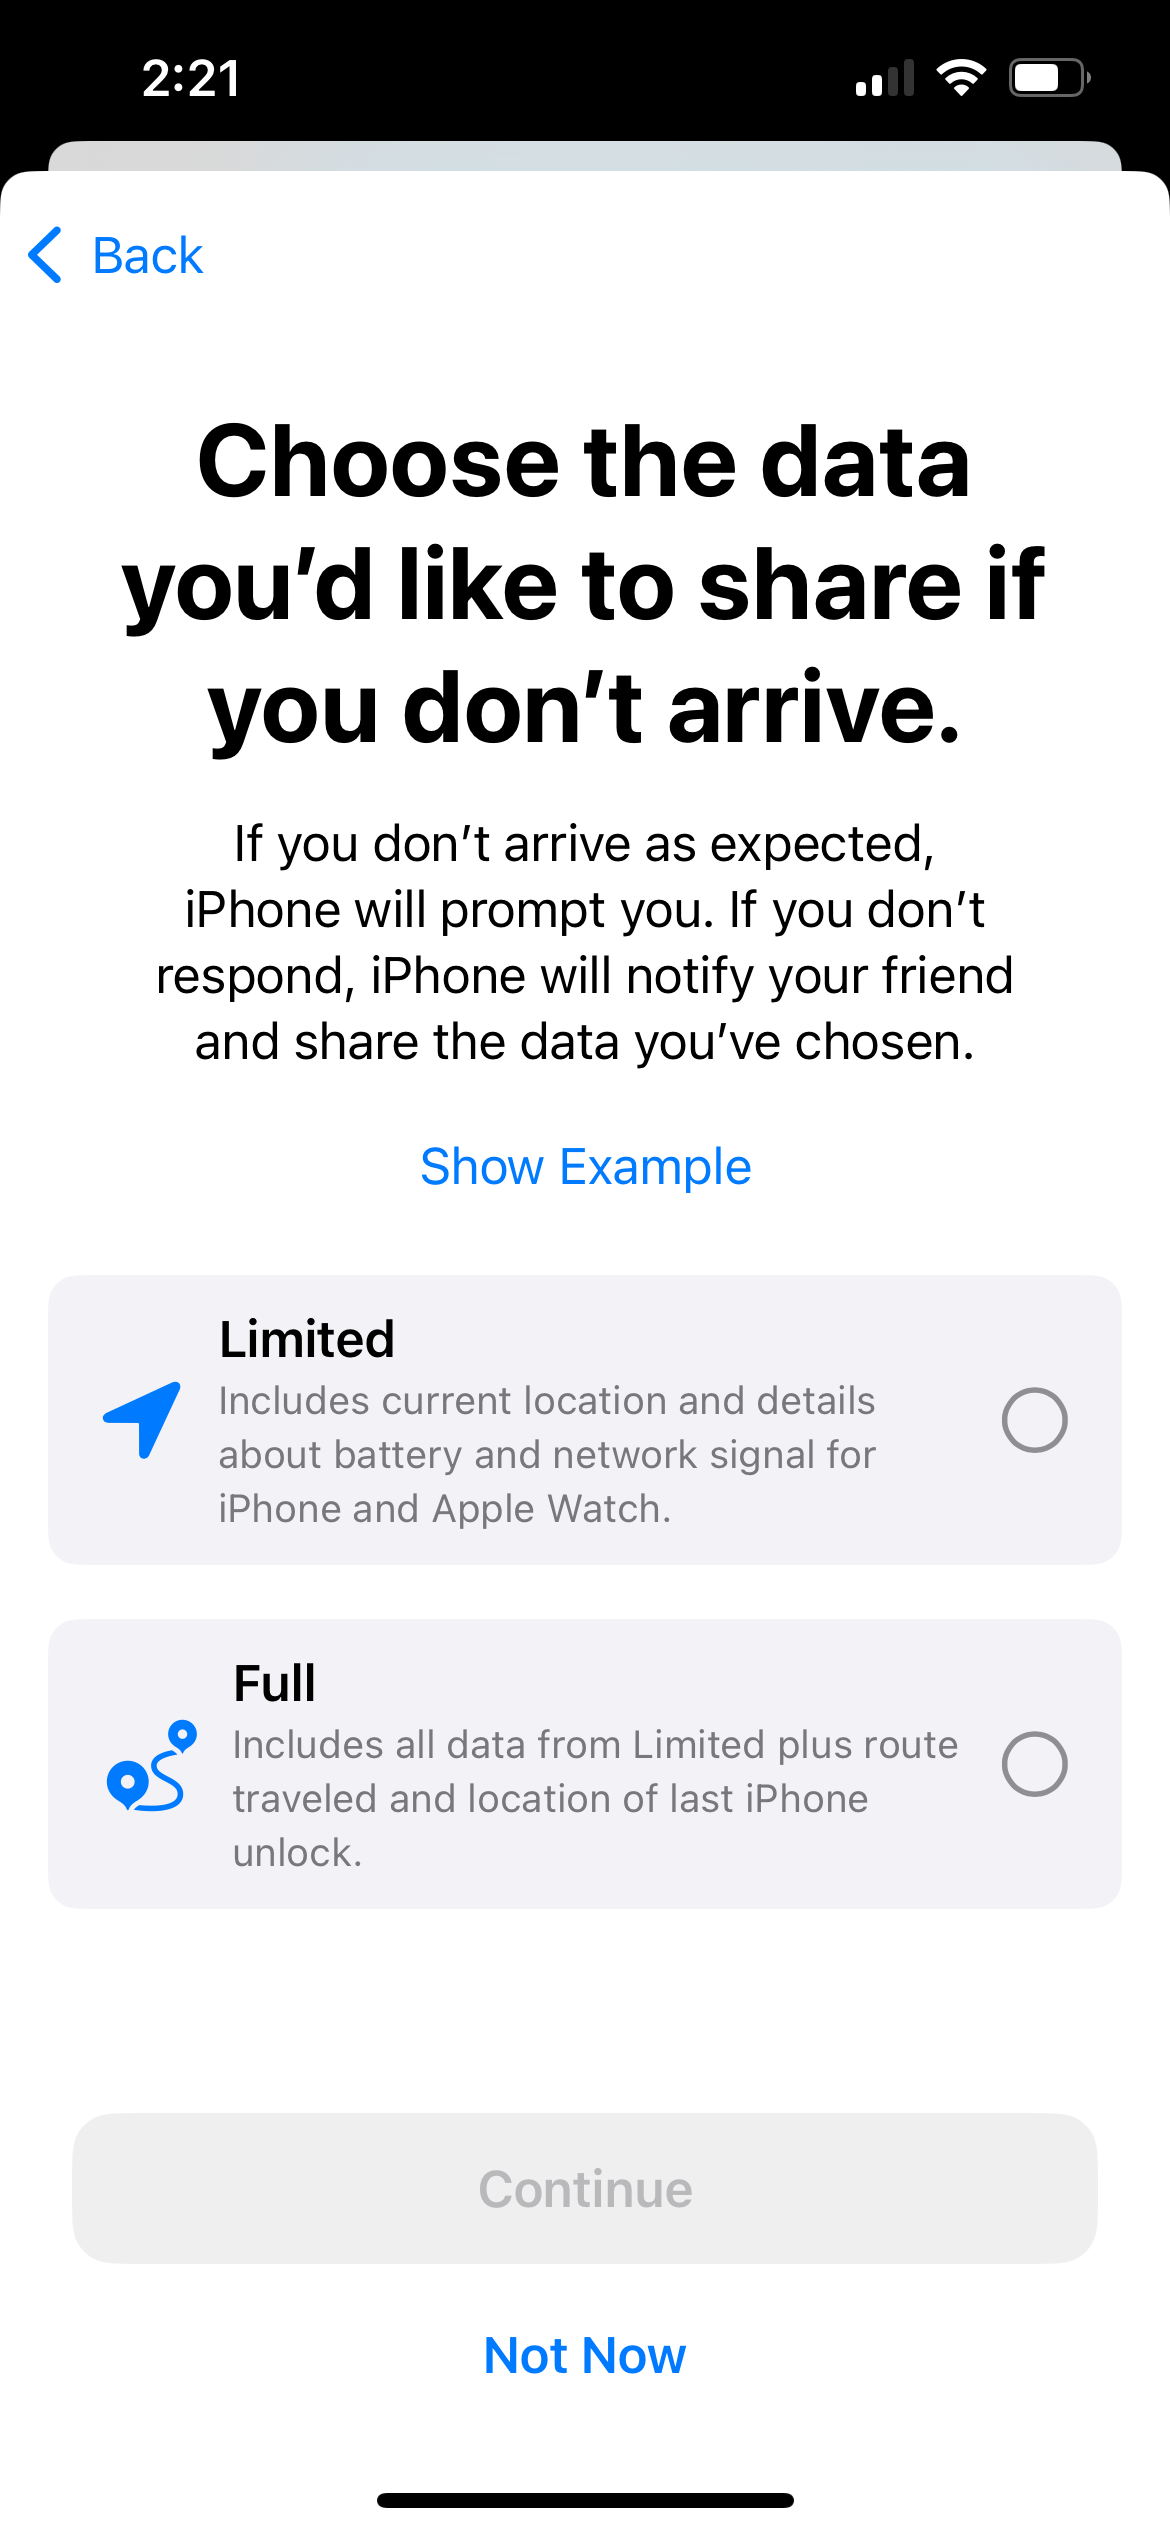
Check in when you arrive to your destination
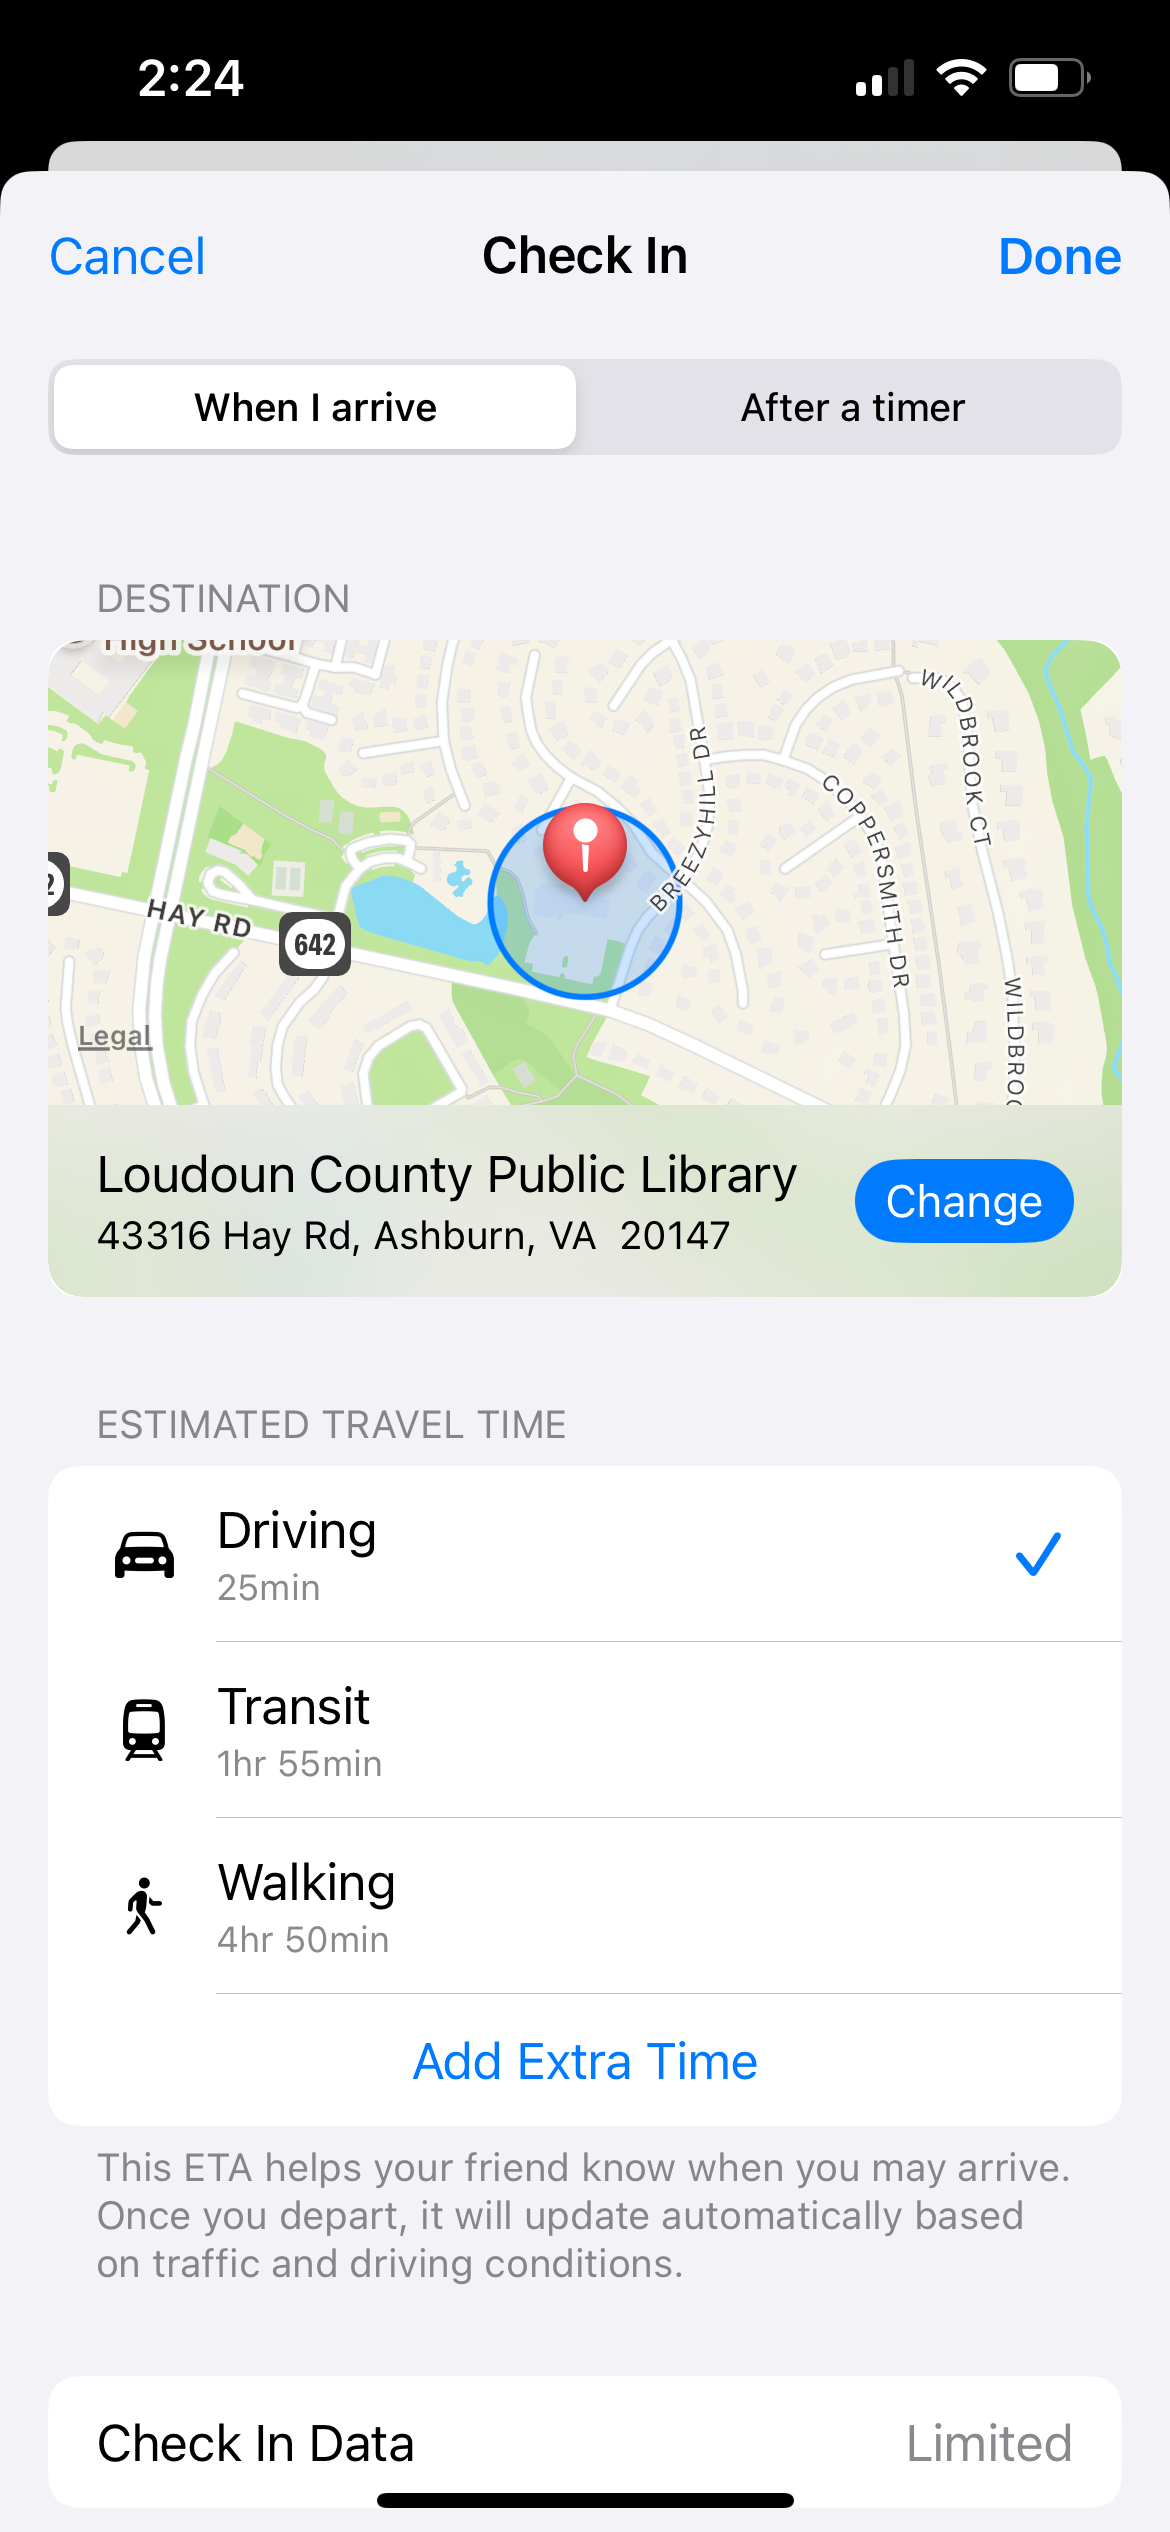
Have you ever been asked by a friend or family member to “text me when you make it home safely”? Now you can do that automatically. The “Check in” feature can automatically alert a friend or family member when you’ve reached a specific destination. Additionally, if a friend sets up a Check In for you but hasn’t arrived as expected, you can view their location, battery percentage, and cell signal.
Here’s how to set it up:
- First we’re going to make sure “Share My Location” is enabled. Go to Settings > Privacy & Security > Location Services > Share My Location and make sure it is turned on.
- Open the conversation with the person you want to receive the alert.
- In the bottom left of your screen, tap the plus sign and find “Check In”.
- Choose the data you’d like to share if you don’t arrive.
- Your contact will be notified:
- When you send the Check In (now), including your destination and approximate arrival time.
- You arrive at your destination. Your contact will be notified and the Check In will end.
- You are delayed and do not respond when prompted. If you are delayed or an Emergency SOS call is placed, you will be prompted. If you do not respond within 15 minutes of being prompted, your contact will be notified.
- Your iPhone is offline for an extended period of time.
- You will see the new Check In in a message. Tap it, then select whether to check in when you arrive or after a timer. You can also select whether you will be traveling by driving, transit, or walking to update the estimated travel time. You can add extra time to the estimate to update the ETA for your friend.
Reminders app features
I love the Reminders app! It’s one of the things that helps me stay sane and stave off mom brain (here are 14 things to use Reminders for). Apple has recently added a lot of functionality to Reminders, and you may not know everything it can do.
Get reminders by location
I just got a Reminder by location minutes before writing this post! I had a key to my cousin’s condo that I needed to return to her, but I wasn’t sure when I would next see her. We do co-work sometimes when I work on Plan. Do. Thrive. and she works on her business, so I set a Reminder to trigger when I arrived at the address of our coworking spot, reminding me to return the key. And it worked!
You can also use it to remind you to do something when getting in or getting out of your car. If you consistently forget your wallet, lunch, or laptop, this may serve as a last line of defense as you’re heading on your commute.
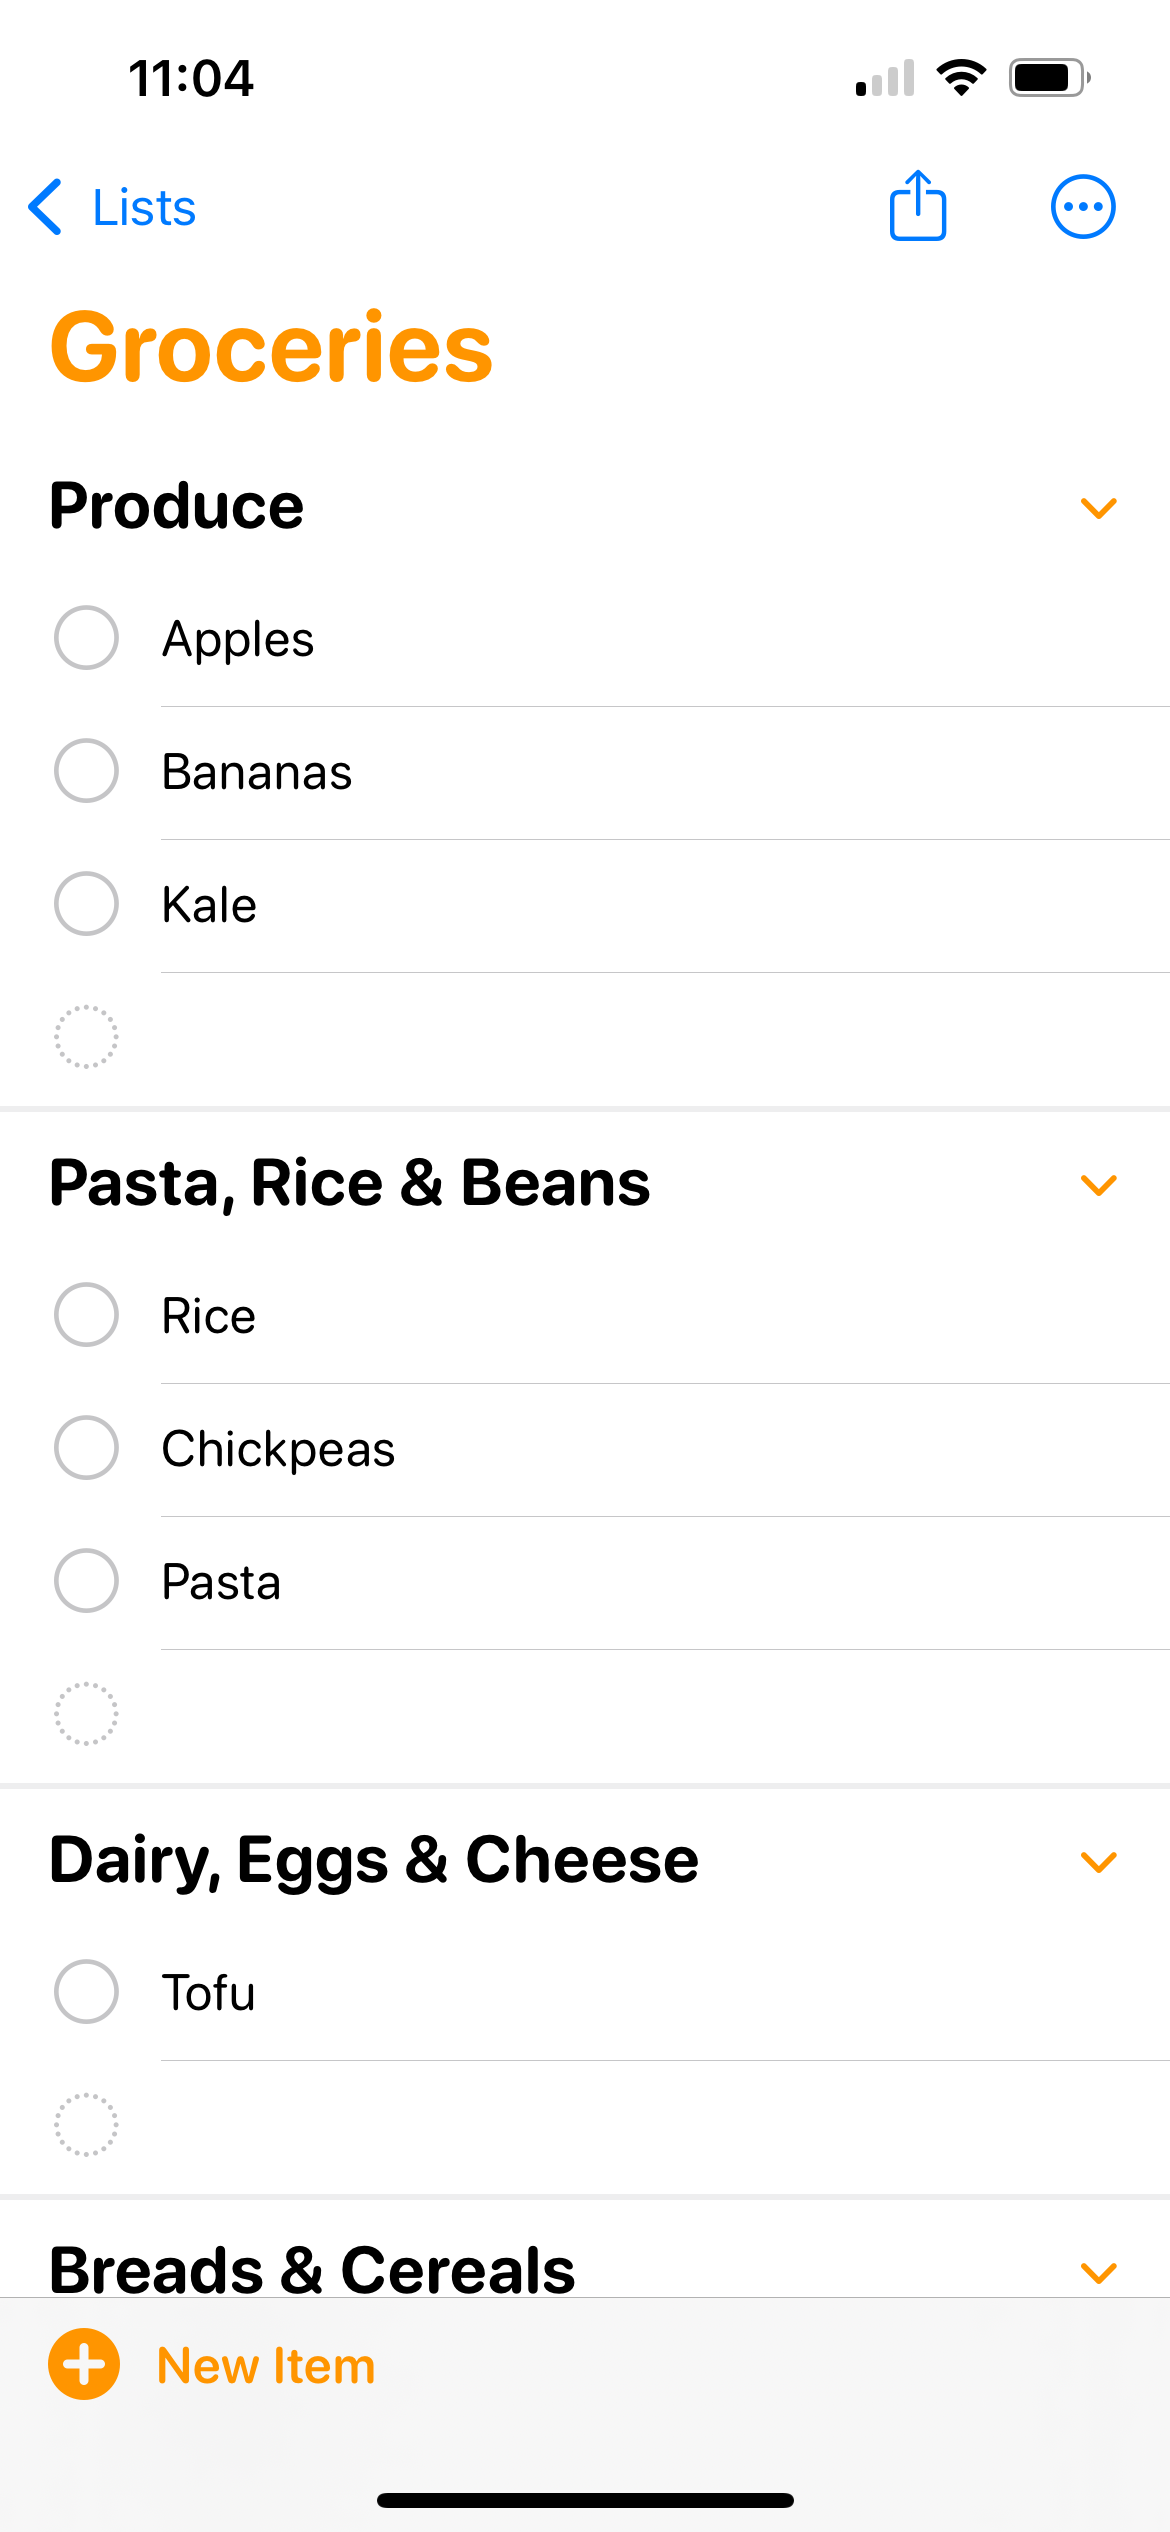
Make Grocery list reminders
When you make a Reminders list, one of the types is “Grocery list.” While working similarly to the regular list type, the grocery list type will automatically sort items you add into categories, such as Product and Bakery. You can move items to different groups, and the list remembers your preferences.
Collaborate on a list of reminders with others
You can also share Reminder lists with other people, as long as they use iCloud. This is helpful for things like a household grocery list or house to-do list. Anyone added to the list can add and edit items, mark items completed, and everyone can see changes everyone has made.
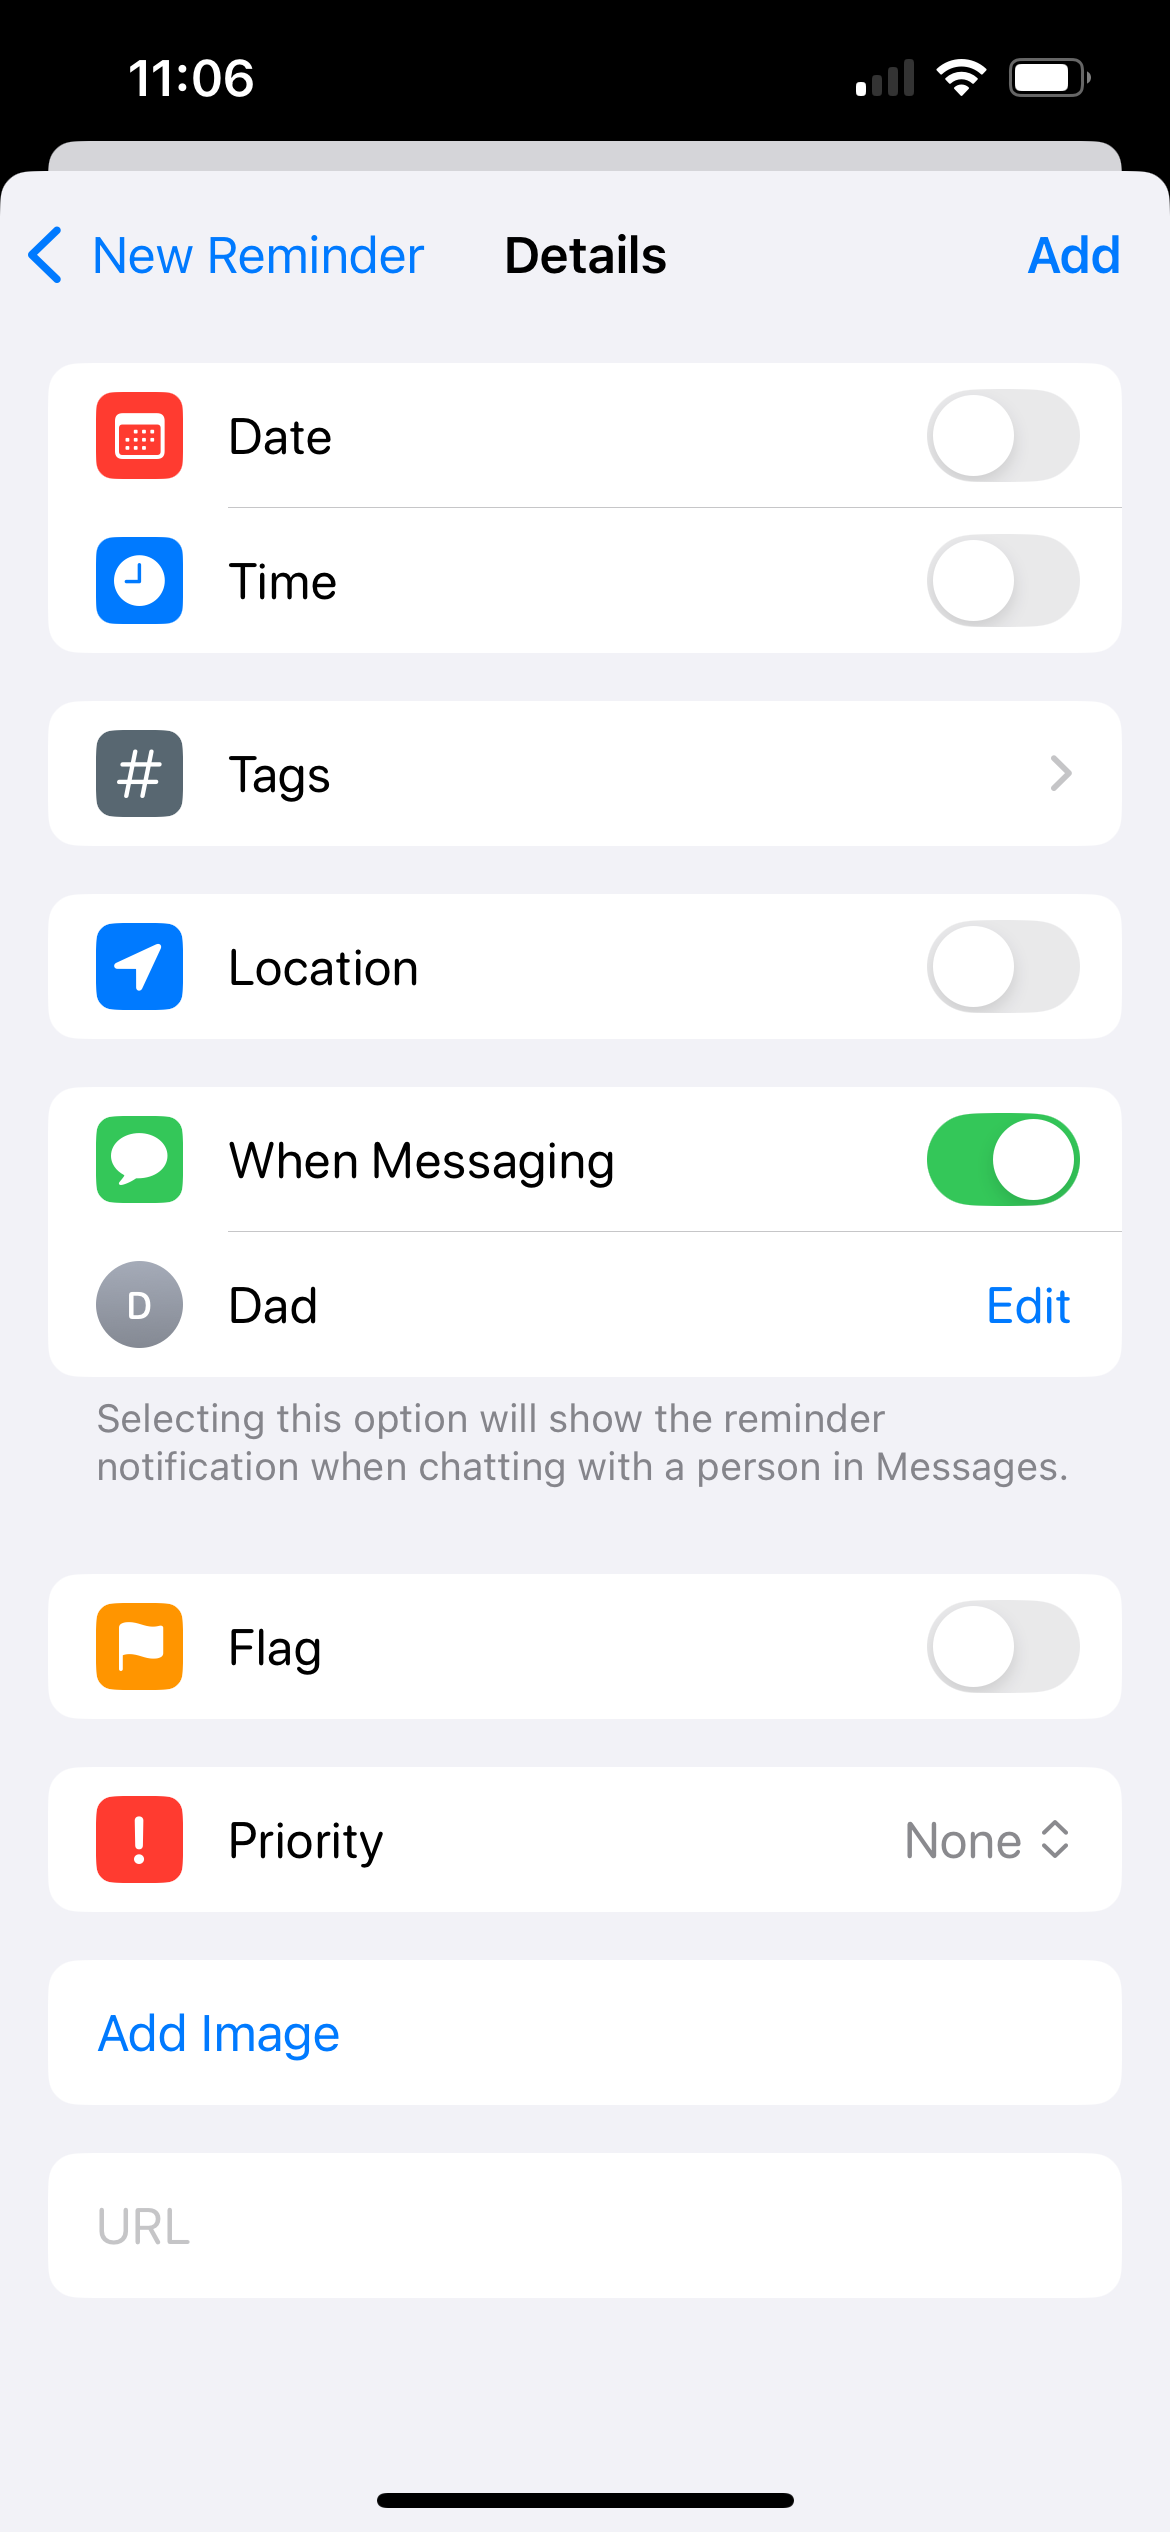
Get reminders when messaging someone
You can have the Reminders app remind you to do something when you’re messaging a specific person in your contact list. Honestly, I haven’t thought of many use cases for this feature, but maybe you will.
Notes features
Another one of my top-used apps is Notes. While my favorite thing about this app is its simplicity, there are a few more advanced features you should know about.
Transcribe spoken speech to text Notes
The Notes app can record audio and transcribe spoken words to text. I love this feature – I’ve used it when I have an idea while driving or walking and need to write it down before I forget.
To do this:
- Start a note, then tap , then tap Record Audio.
- To start the recording, tap .
- When you’re done, tap .
- To see the transcript, tap .
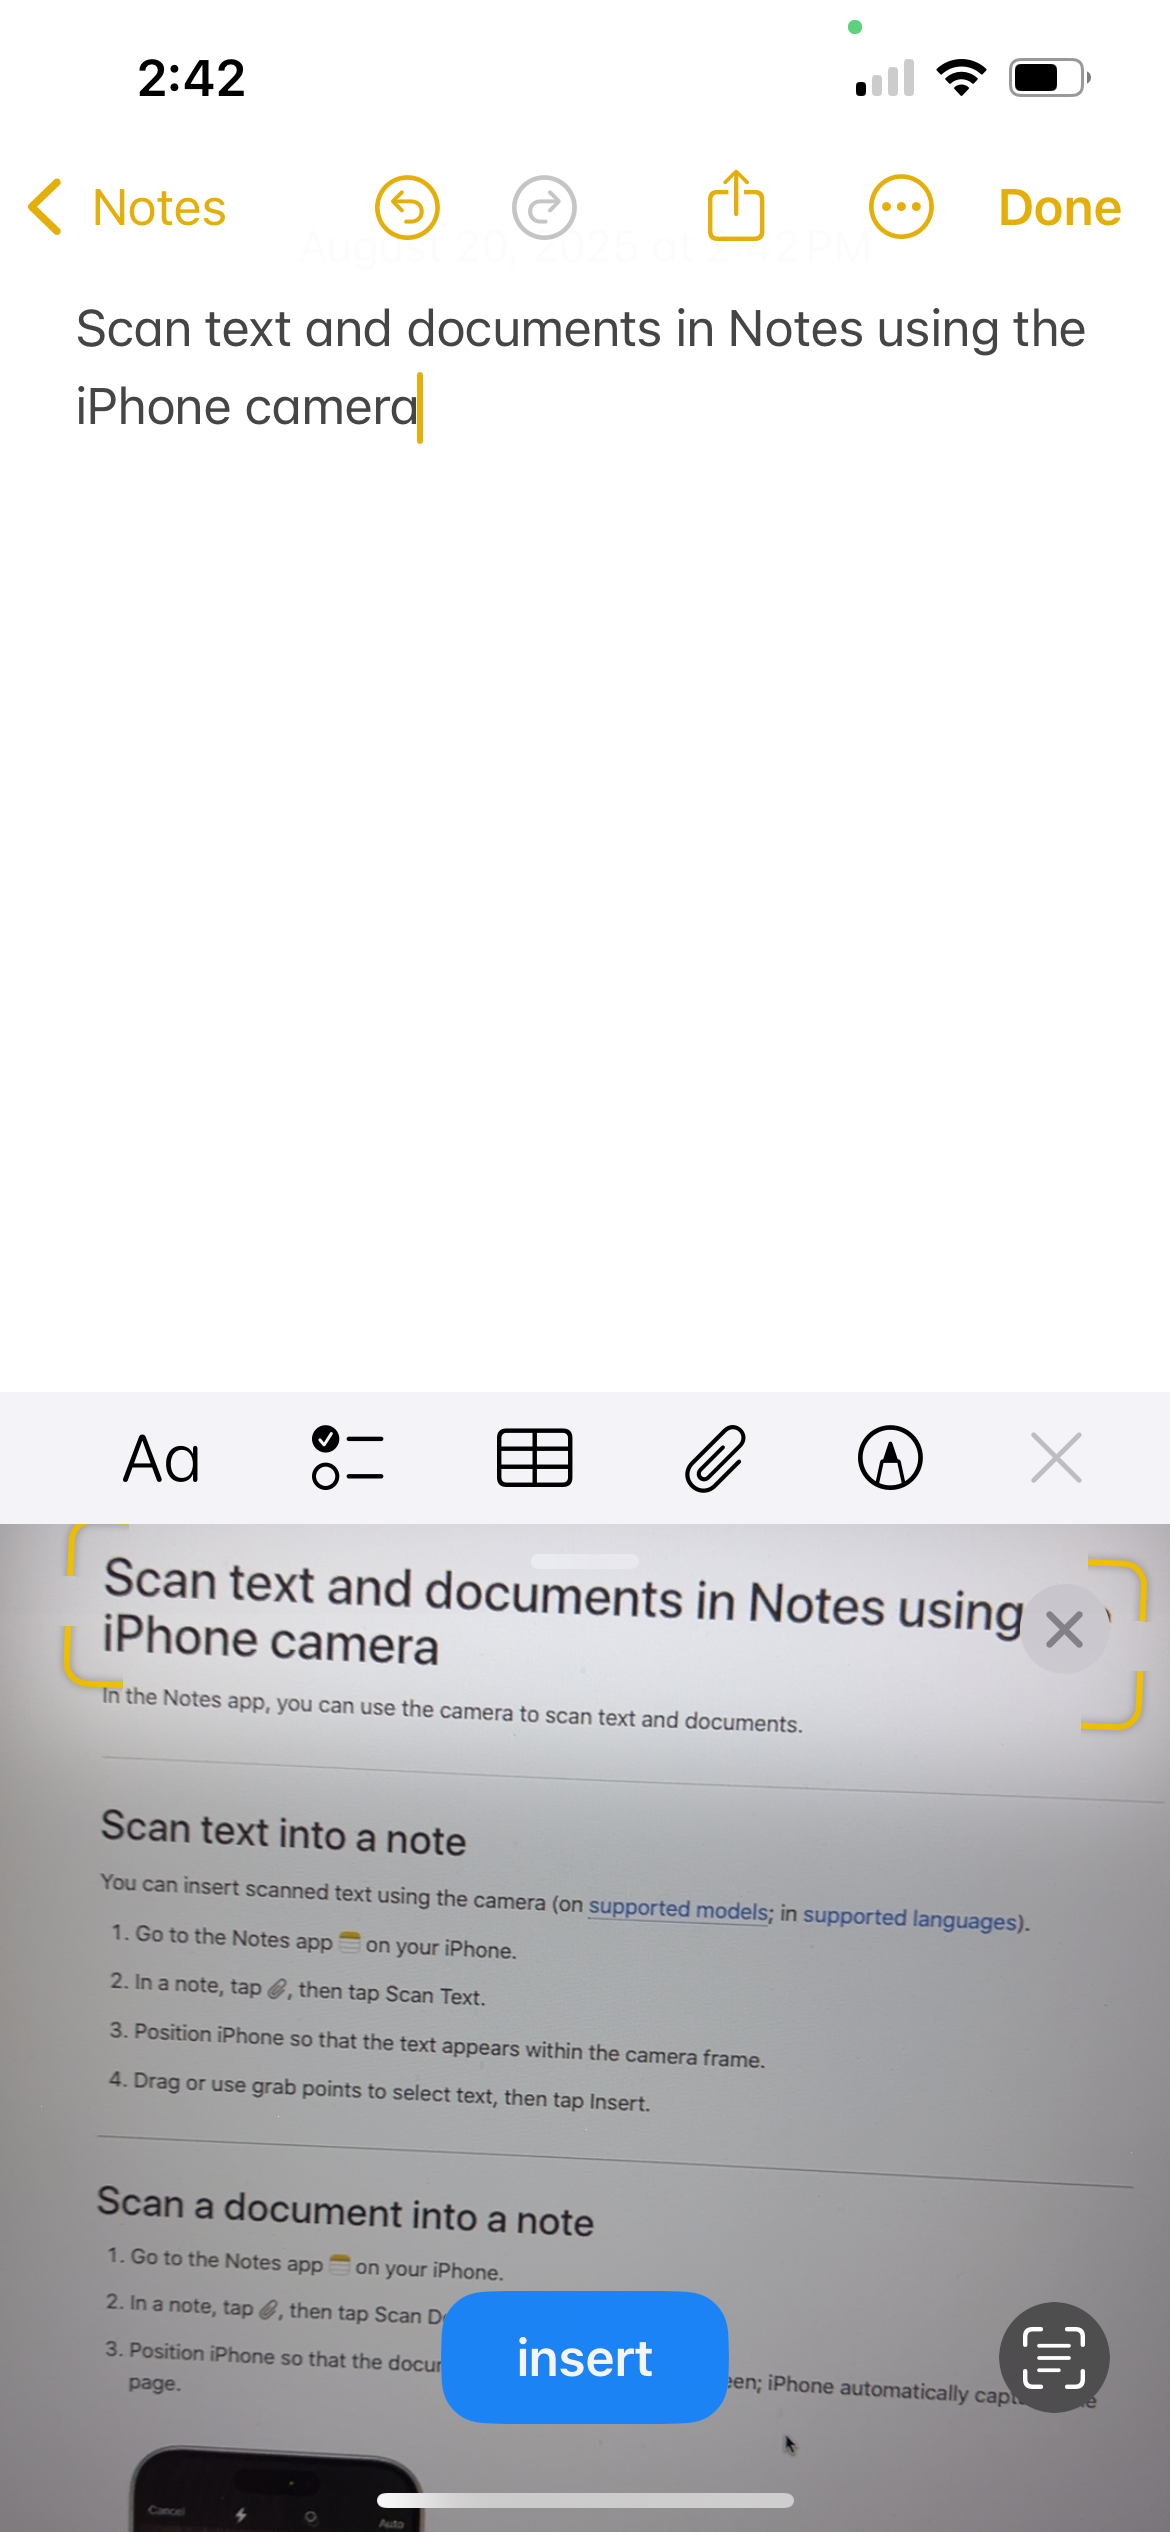
Scan text into a Note using your camera
Another hidden feature to get text into a Note is with your camera. You could automatically grab text from anything, like a page in a book, a sign, etc. To use it:
- In the Notes app, inside a note, tap , then tap Scan Text.
- Position iPhone so that the text appears within the camera frame.
- Drag or use grab points to select text, then tap Insert.
Camera & visual tools
The iPhone Live Text feature lets you copy, share, look up, and translate text in the camera frame. You can also easily call phone numbers, visit websites, convert currencies, and more based on what text appears in the camera frame. Here’s how to use it:
- Open your Camera app and position your iPhone so you can see the text within the camera frame
- After the yellow frame appears around detected text, tap .
- Touch and hold the text, then use the grab points to select specific text and perform any of the actions below:
- Copy: Copy text to paste into another app such as Notes or Messages.
- Select All: Select all the text within the frame.
- Look Up: Show personalized web suggestions.
- Translate: Translate text.
- Search Web: Look up the selected text on the web.
- Share: Share text using AirDrop, Messages, Mail, or other available options.
Use your iPhone camera as a magnifying glass
This one is a great tip for reading tiny-font restaurant menus, or any other time you want to “zoom in” on something in real life. Have you used the “Magnifier” app on your iPhone? Here’s how to use it:
- Open the app “Magnifier” on your phone (I had apparently deleted the app from my home screen and had to search for it).
- Point your camera at the text or object you want to magnify, then drag the slider to zoom in or out
- Tap to temporarily freeze the frame
You can also set up a shortcut to quickly open Magnifier with a button click or from the Control Center. See Quickly turn accessibility features on or off.
Measure physical objects with your iPhone
Do you use the “Measure” app from Apple? It’s like a virtual measuring tape. All you need is your phone to measure objects. It even detects the dimensions of rectangular objects automatically. Otherwise, you can tap to measure the distance between points.
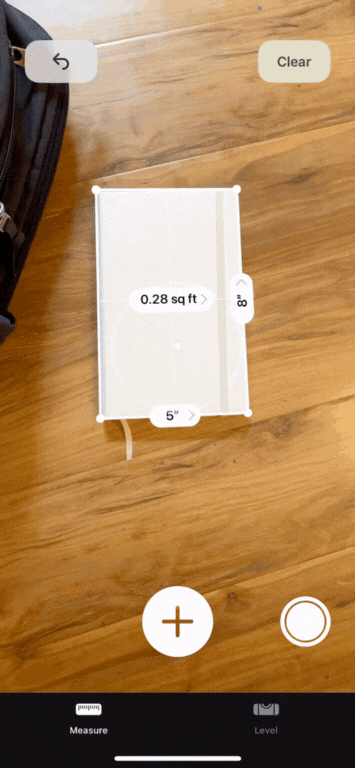
I can think of two ways I’m going to use this right away. I need to measure dimensions of an object I’m listing for sale on eBay; and I need to measure the area in front of my shower so I can order the right size bathmat. (You all know I prefer to buy used goods, but I think this is one category where I’m going to have to buy new.)
It also works as a level, which would have been useful last weekend when my husband and I hung storage racks in our garage!
Translate text with your camera and the Translate app
This is a must-know for travelers. You can use the Translate app to translate text around you, such as on street signs or restaurant menus. Here’s how:
- Open the Translate app on your iPhone
- Tap Camera, then choose the language you want the text translated into
- Position your camera so you can see the text and it will be translated in real time. You can tap to pause the view.
- Or, tap to open a photo from your Photo Library to translate text in that image.
Accessibility & control shortcuts
Control your iPhone with your eyes
We’re living in the future, dude! Eye tracking lets you control your iPhone with your eyes. Designed as an accessibility feature, most users say that this tech still has a ways to go before it’s really useful as assistive technology. I have to agree. I messed around with it for a few minutes and couldn’t really get the hang of navigating and selecting what I wanted to. But for now it’s cool to try and get a sense of where this technology will go in the future.
To turn on eye tracking:
- Go to Settings > Accessibility > Eye Tracking, then turn on Eye Tracking.
- Follow the onscreen instructions to calibrate Eye Tracking. As a dot appears in different locations around the screen, follow its movement with your eyes.
Note: You need to calibrate Eye Tracking every time you turn it on.
To use eye tracking:
An on screen pointer follows the movement of your eyes. When you hold your gaze steady, the dwell pointer appears where you’re looking. When the timer finishes, you will tap on the item (unless you’ve changed this setting.)
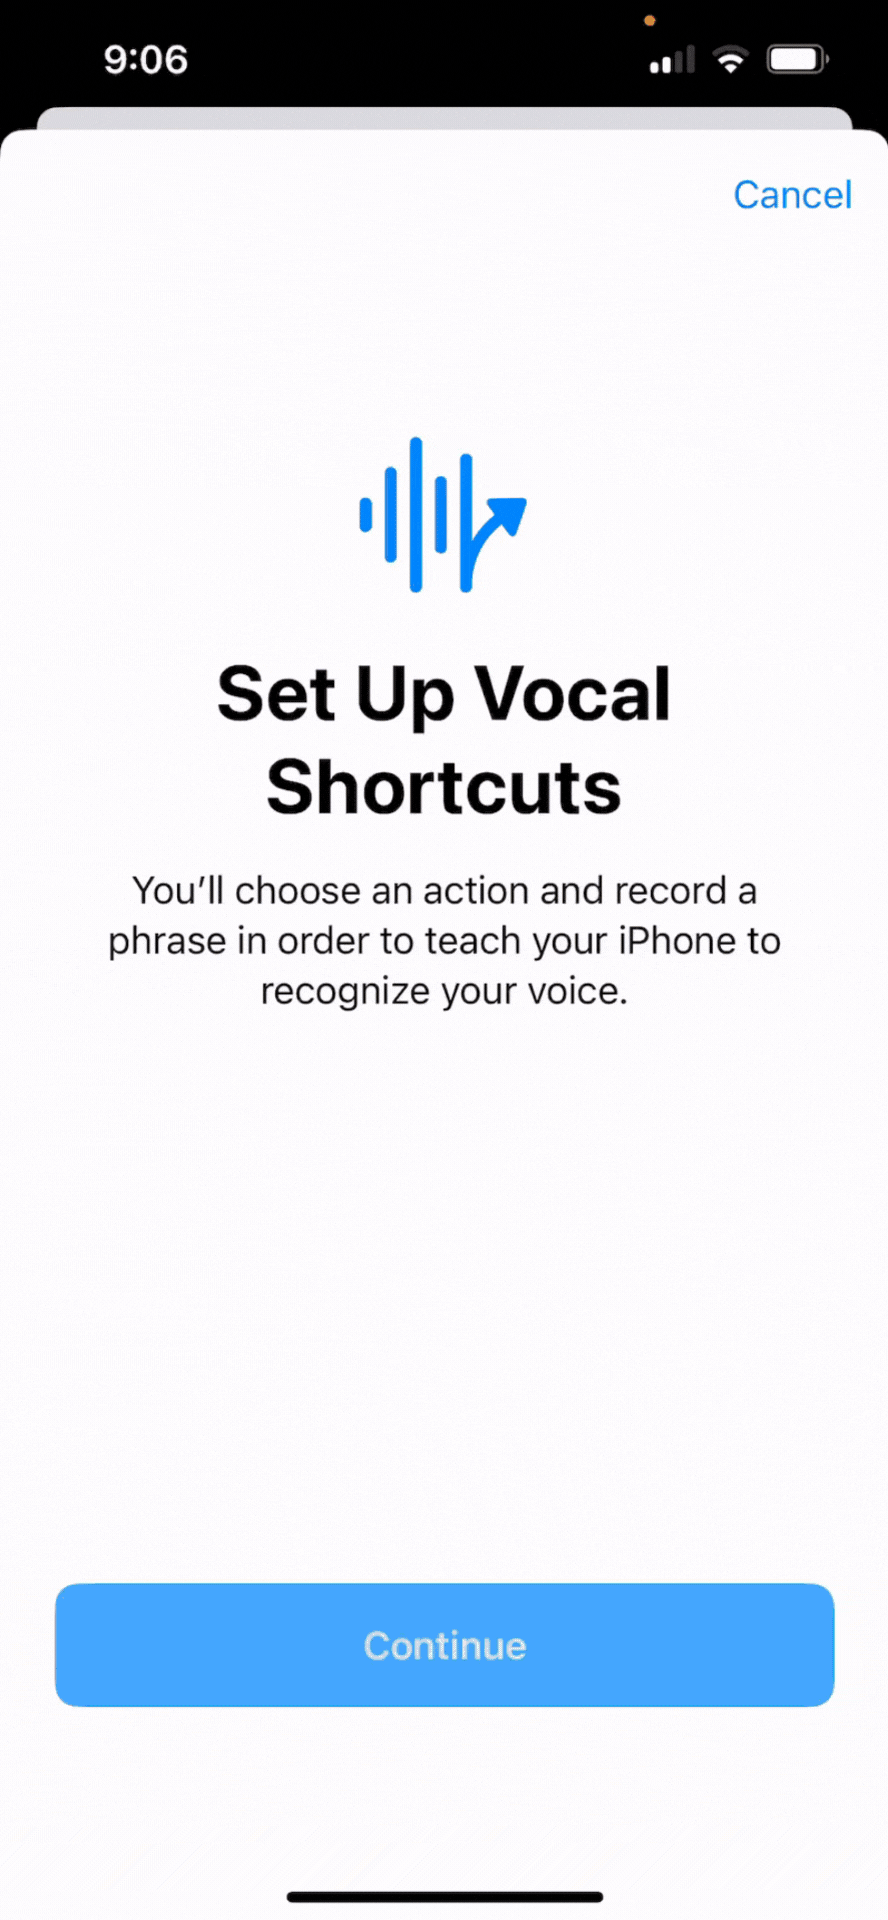
Set up custom vocal shortcuts
Vocal shortcuts let you set up spoken commands to have your iPhone take actions. It’s an accessibility feature designed for those with atypical speech, but you can add your own shortcuts. It allows you to say commands without prefacing with “Hey Siri”, and when combined with shortcuts created using the Shortcuts app, allows you to take multi-step actions with a single phrase.
Here I set up a simple command so that when I say “Open camera”, it opens the camera app.
Freeze your screen to a single app
I wish I’d known about this when my youngest child was a toddler! With iPhone’s “Guided Access” function, you can temporarily keep your phone frozen on a single app, so that you can show someone something without them swiping away…or keep a toddler busy with a game while you’re using a public restroom without them opening Amazon and ordering “American Hustle” (I’m sure I don’t have to tell you why this example is so oddly specific.) You can even use this feature to keep yourself on task when you have work to do in a single app and want to prevent yourself from switching to others.
To set up Guided Access as an option:
- Go to Settings > Accessibility > Guided Access, and turn on Guided Access.
- Set up any additional settings, such as ending the session with a passcode or Face ID; setting an alarm to go off before the Guided Access time ends; and setting the auto-lock time during a Guided Access session.
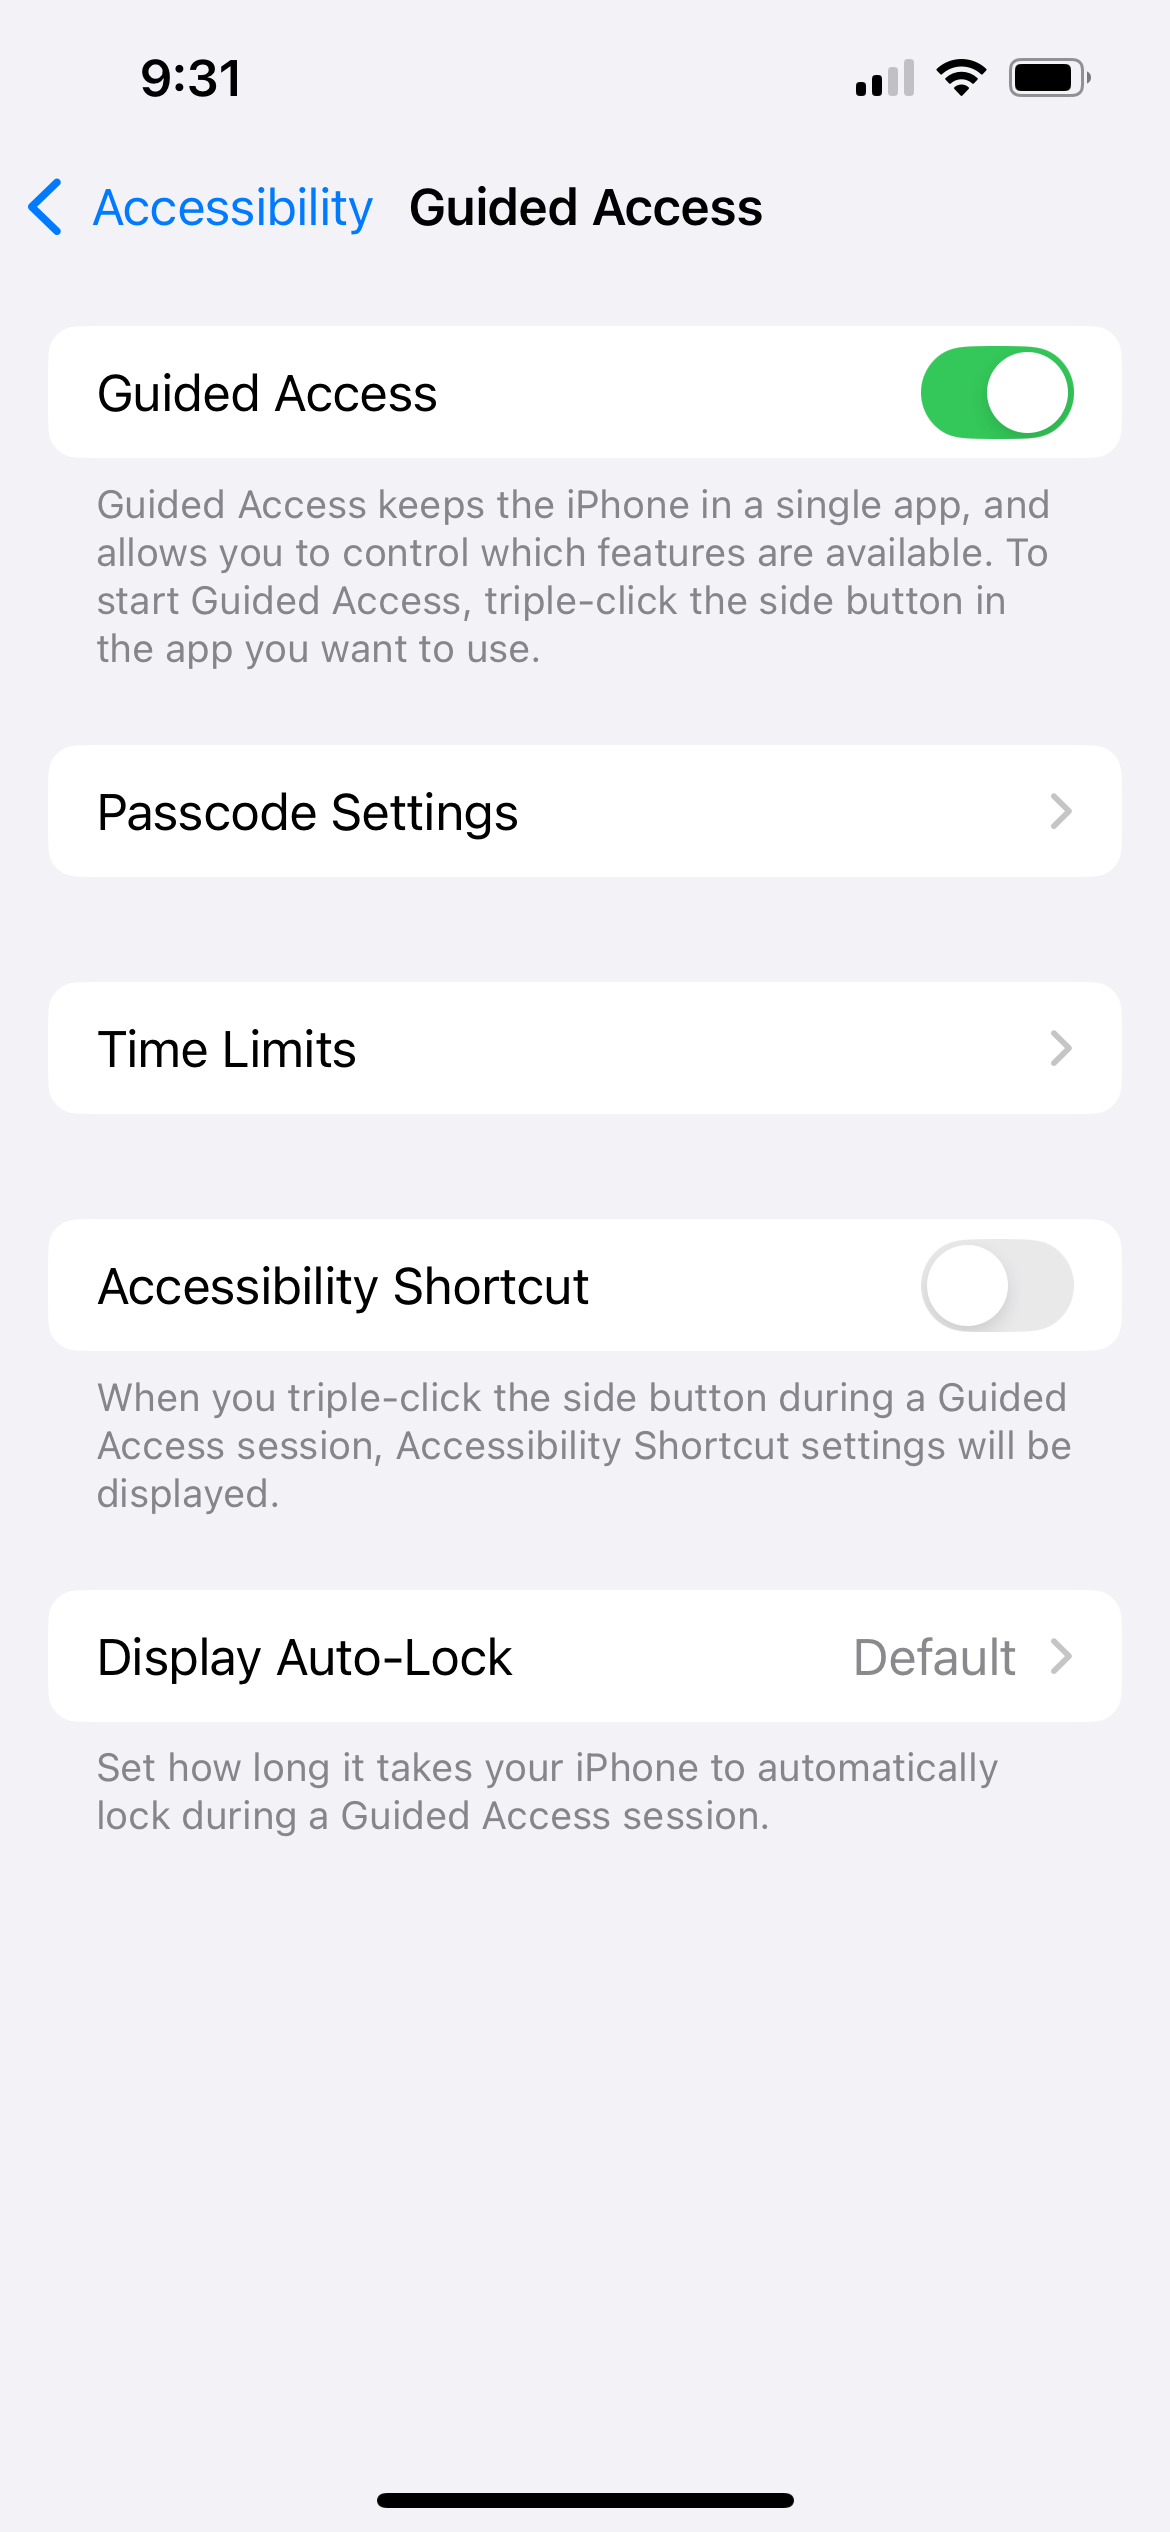
To start a Guided Access session:
- Open the app you want to use
- Turn on Guided Access by:
- Asking Siri something like “Turn on Guided Access”
- Using the Control Center (swipe down from top of screen) if you’ve added Guided Access there
- Triple-click the side button to use the Accessibility Shortcut. You’ll see a pop-up with the Accessibility features you have turned on. (Unless Guided Access is the only one you’ve turned on.)
- Circle any areas of the screen you want to disabled
- Tap Options to turn on or off the side button, volume buttons, motion (to prevent iPhone from switching from portrait to landscape for example), software keyboards, touch, and/or time limit.
- Tap Start.
To end a Guided Access session:
- Use passcode: If you set up passcode when you set up Guided Access, triple-tap the side button and enter the Guided Access passcode. If you didn’t set a Guided Access passcode, enter your iPhone passcode.
- Use Face ID or Touch ID: If you turned on the Face ID or Touch ID option in Guided Access Passcode Settings, double-click the side button, then unlock your iPhone with Face ID or Touch ID.
Have your iPhone read text aloud to you
I love to go on walks around my neighborhood to clear my head. While sometimes I enjoy the quiet, other times I want to use the time to noodle on my notes about a writing project. Or maybe there’s an article I want to read while driving. For any of these, I love to have my iPhone read on screen text to me. iPhone has quite a few voices available, too.
Here’s how to have your iPhone read text aloud to you:
- To turn on the feature:
- Go to Settings > Accessibility > Spoken Content
- Turn on your desired options:
- Speak selection: Have iPhone speak text you select
- Speak screen: when you swipe down with two fingers from the top of the screen, your iPhone will read it aloud to you
- Speech controller: keeps the Speak Screen controls on the screen all the time. I’m guessing you don’t want this.
- Highlight content: Has iPhone highlight what it is reading aloud. You can select words, sentences, or words and sentences, as well as whether you want the highlight to be underline or background color.
- Adjust settings for voices, speaking rate, etc.
- To use the feature:
- Swipe down with two fingers from the top of the screen, if you have turned on Speak Screen. Use the controls that appear to pause speaking, adjust the rate, navigate forward or backward, or tap to hear the text you want iPhone to read.
- Select the text you want spoken, if you have turned on Speak Selection, and tap Speak.
- Or, use Siri and say “Speak screen.”
If you want to hear a webpage you have open in Safari, there’s another way to do that. With the web page open in Safari, Tap ![]() , then tap Listen to Page.
, then tap Listen to Page.
Everyday convenience
Shake your phone to undo or redo
If you type something out and want to delete it (say, an angry response to a text you shouldn’t actually send? We listen and we don’t judge), there’s a shortcut you should know. Just shake your iPhone to undo. It can undo typing, archiving an email, moving an app, deleting a text, and other actions.
Copy and paste between your iPhone and other Apple devices
If you, like me, regularly use your Mac and iPhone near each other, hopefully you’ve discovered this on your own. But in case you haven’t! Did you know you can copy text on one device and paste it on another? I use this all the time! All you need to do is make sure both devices have Wi-Fi, Bluetooth, and Handoff turned on (they probably do) and are signed in to the same Apple account.
Use tab groups on Safari
You can group and save tabs you have open in Safari by subject to save them for later. For example, I might have a group for an item I’m shopping for; my kids’ school info; an article I’m working on; etc.
To create a new Tab Group:
- In Safari, tap to view your open tabs.
- Touch and hold a tab, then choose Move to Tab Group.
- Tap New Tab Group, enter a name, then tap Move.
Use your iPhone as a clock or photo frame while charging
iPhone has this neat capability to turn your phone into more of a display frame when it’s charging. You can have your phone show a clock, photo frame, or widgets.
To start StandBy:
- Go to Settings > StandBy and make sure it is turned on.
- Connect your iPhone to a charger and set it down on its side.
- Press the side button.
- Swipe left or right to switch between widgets, photos, and clocks. Swipe up or down to scroll between options for each of these views.

Use Apple Pay for contactless payments at stores, restaurants, etc.
Just like credit cards can be used to “tap to pay” for in-person payments where you see symbols like this  , your iPhone can be used too.
This seems somewhat ubiquitous, so you may already be using or familiar with this feature. However, my mom was delighted to see me pay this way at a store and asked me to show her how, so I’m going to include it on this list!
First, you’ll need to have Apple Pay set up with a credit, debit, or prepaid card. Then when it comes time to pay, double-click the side button on your phone and authenticate with Face ID or your passcode. Hold the top of your iPhone near the card reader until you see Done or a checkmark on the screen. If your model of iPhone has Touch ID instead of Face ID, rest your finger on Touch ID and hold your phone near the card reader instead.
You can also pay with a different card instead of your default card. When you’re paying and your default card appears, tap it, then choose another card and continue as above.
So let me know: which of these hidden iPhone features are you most excited to start using?
Next up: 19 tech tips for parents.